Category: Isla del Cangrejo

Inshore vs Offshore Fishing: Key Differences, Species & Gear

Planning a fishing trip along Florida’s Gulf Coast? The decision between inshore vs offshore fishing is often the first one you’ll face. Both styles deliver unique experiences, and understanding their differences helps you choose the right adventure based on your skill level, budget, and the species you want to catch.

At Original Crab Island, we’ve guided countless visitors through Destin’s diverse fishing opportunities, from calm backwaters and bays to the deep blue Gulf of Mexico. Our location on the Emerald Coast puts both fishing worlds within easy reach, making it an ideal home base whether you’re a first-timer or a seasoned angler.

This guide covers the key distinctions between inshore and offshore fishing: water depth and distance from shore, target species, gear requirements, and what to expect on the water. By the end, you’ll know exactly which style fits your next fishing trip in Destin.

Why the inshore vs offshore difference matters

Inshore vs Offshore Fishing: Key Differences, Species & Gear

Your choice between inshore and offshore fishing shapes every aspect of your trip, from the cost and duration to the physical demands and species you’ll encounter. These two fishing styles operate in completely different environments, and matching your choice to your group’s preferences prevents disappointment on the water. A family with young children will have vastly different needs than a group of experienced anglers chasing trophy fish.

Understanding these differences upfront helps you set realistic expectations and budget appropriately. The gap between inshore and offshore isn’t just about where you fish, it affects everything from the boat type required to the tackle you’ll use and the experience level needed to enjoy yourself.

Budget and time considerations

Offshore charters typically cost more because they require larger boats, burn more fuel traveling to fishing grounds, and demand specialized equipment. You’ll spend four to eight hours on an offshore trip, with a significant portion dedicated to reaching productive waters 10 to 50 miles from shore. The investment reflects the adventure: targeting larger, harder-fighting species in deeper water.

Inshore trips offer shorter durations and lower prices, making them ideal for families, beginners, or visitors with limited time. You can book half-day trips of three to four hours that stay within a few miles of the coast. The reduced fuel costs and shorter distances translate directly to your wallet while still delivering excellent fishing opportunities.

"The right fishing style depends on your group’s experience level, budget, and what kind of catch you’re hoping to bring home."

Physical demands and comfort levels

Offshore fishing challenges you with rougher seas, stronger winds, and constant boat motion that can trigger seasickness in those unprepared for Gulf swells. You’ll stand for extended periods while fighting fish that test your endurance, and bathroom facilities on smaller offshore boats can be basic at best.

Inshore waters provide calmer conditions and easier access to land if someone needs a break or feels uncomfortable. The protected bays, channels, and flats around Destin experience minimal wave action, creating a more relaxed environment for first-time anglers or those concerned about seasickness. You’ll fish from boats that can quickly return to shore if weather changes or someone needs assistance.

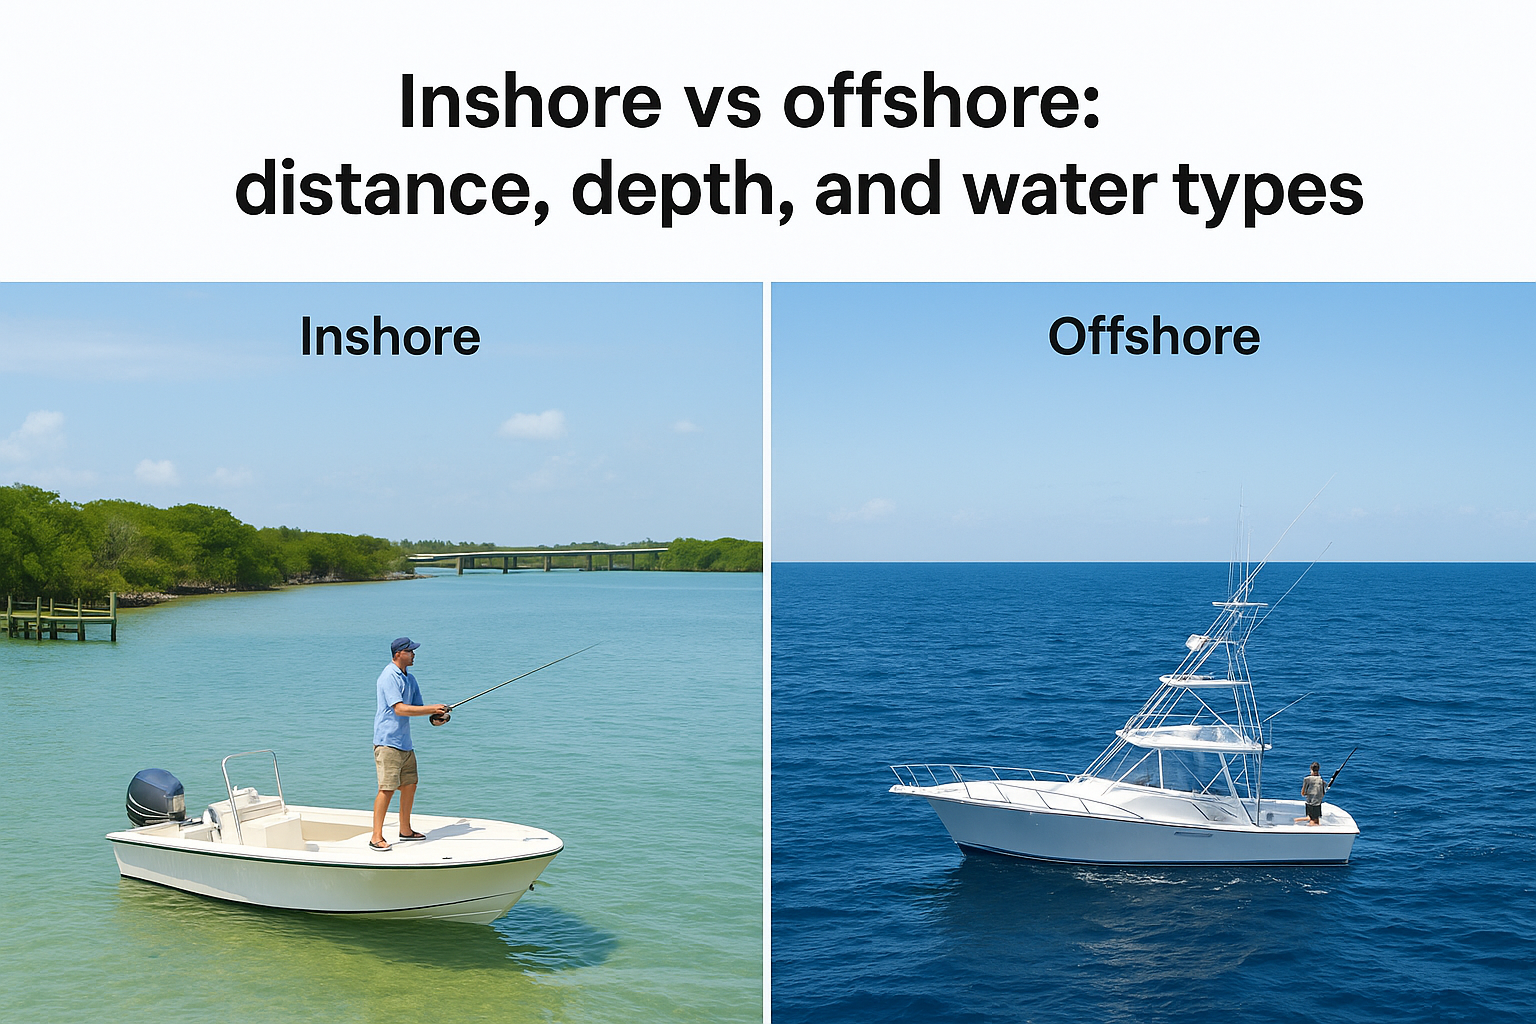
Inshore vs offshore: distance, depth, and water types

The physical environment separates inshore vs offshore fishing more than any other factor. These distinctions define the species you’ll encounter, the equipment you’ll need, and the overall experience on the water. Understanding where each fishing style takes place helps you visualize what your day will look like.
Inshore vs offshore: distance, depth, and water types

Distance from shore

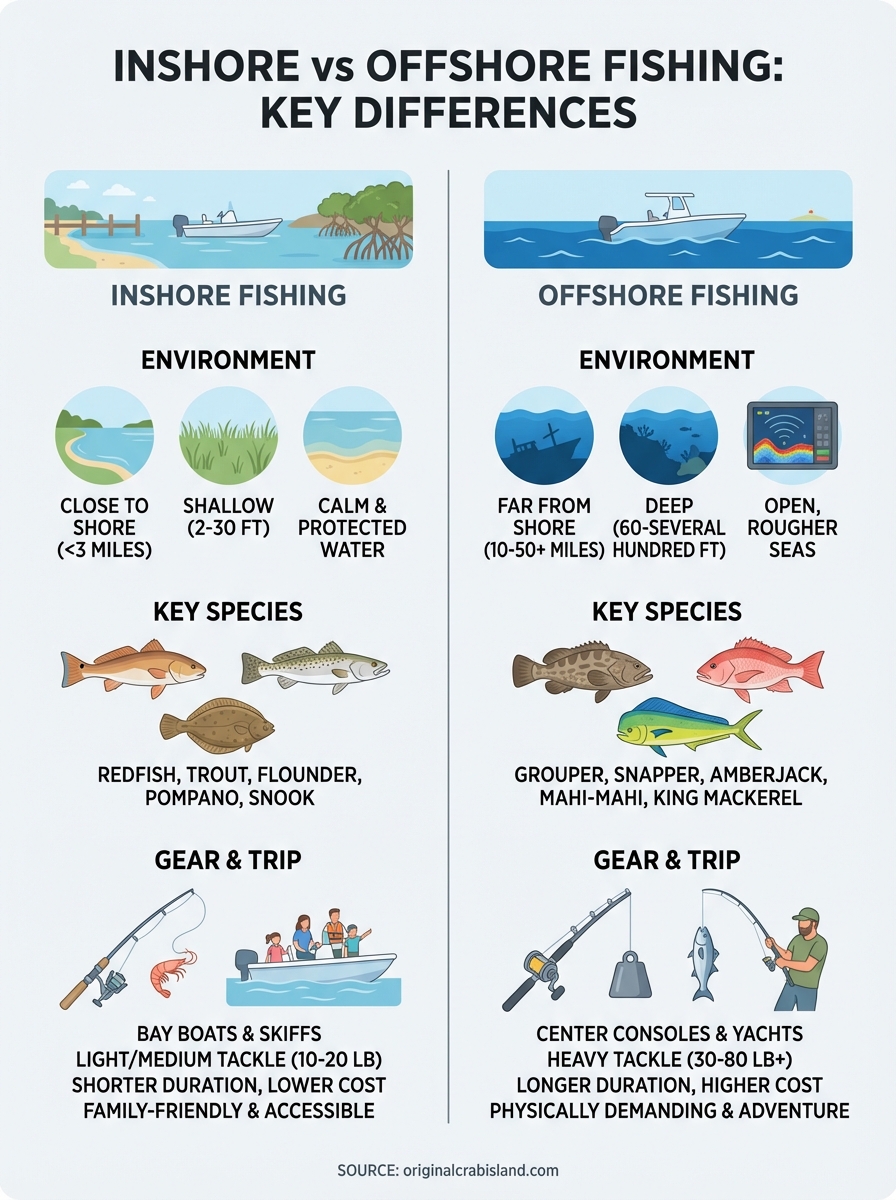
Inshore fishing happens in waters within three miles of the coastline, keeping you close to visible landmarks and protected areas. You’ll fish around docks, bridges, grass flats, and mangrove-lined channels where you can still see shore throughout your trip. The proximity means shorter travel times and quicker returns if weather shifts or conditions change.

Offshore fishing pushes you 10 to 50 miles into the Gulf, where land disappears from view and you’re surrounded by open water. Your captain navigates using GPS and sonar to locate underwater structures, ledges, and temperature breaks that concentrate game fish. These distant fishing grounds require dedicated travel time and fuel, but they provide access to species that never venture near shore.

Water depth and bottom structure

Inshore waters typically range from 2 to 30 feet deep, with visible sandy bottoms, seagrass beds, and oyster bars that create habitat for baitfish and predators. You’ll see the water color shift from emerald green to lighter blues as depth changes, and structure like pilings and rock piles becomes a focal point for targeting fish.

"The depth difference between inshore and offshore fishing completely changes the species, techniques, and equipment you’ll use."

Offshore fishing takes place in depths from 60 to several hundred feet, where bottom structure includes artificial reefs, shipwrecks, and natural ledges. The deep blue water reveals little about what’s below, making electronics essential for locating fish and productive spots.

Species you can target in Destin and beyond

The species available in inshore vs offshore fishing differ dramatically because each environment supports distinct food chains and habitats. Your target fish determines whether you’ll stay near the coast or venture into deep water, and understanding what swims where helps you plan the trip that delivers the catch you want.
Species you can target in Destin and beyond

Inshore species around Destin

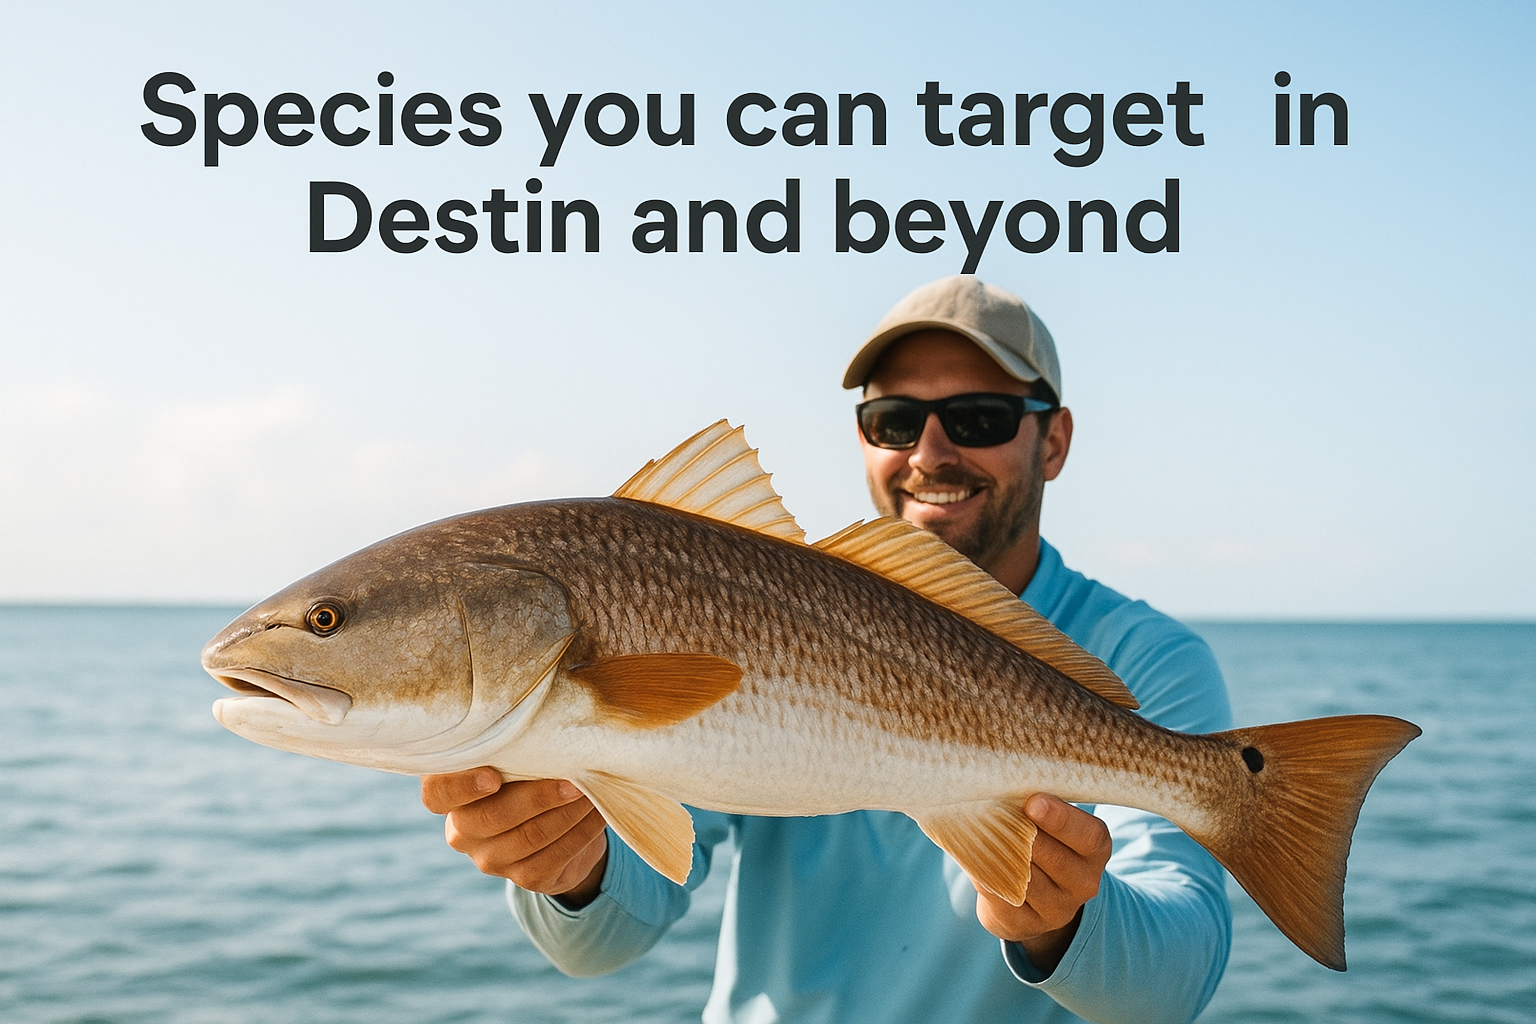
Shallow waters around Destin hold redfish, speckled trout, and flounder as primary targets throughout the year. You’ll find these species cruising grass flats, hiding near oyster bars, and ambushing prey around dock pilings. Pompano and Spanish mackerel arrive seasonally, with pompano running in spring and fall while mackerel show up during warmer months. Sheepshead congregate around structures with barnacles and crustaceans, offering excellent table fare for anglers who master their light bite.

Black drum, ladyfish, and jack crevalle round out the inshore roster, providing action when your primary targets aren’t biting. These species thrive in the protected waters of Choctawhatchee Bay, East Pass, and the channels connecting them to the Gulf.

Offshore targets in the Gulf

Deep water fishing delivers grouper, snapper, and amberjack as staple species that justify the fuel and time investment. Red snapper season draws anglers offshore in droves, while gag grouper, red grouper, and scamp provide year-round opportunities when you find the right structure. Amberjack fight harder than their size suggests, testing your arms and tackle around wrecks and reefs.

"Offshore species grow larger and fight harder, but inshore fish offer consistent action closer to home."

King mackerel, mahi-mahi, and wahoo bring speed and spectacular strikes to offshore trips, with kings available most of the year and mahi appearing during summer. Blackfin tuna and occasional sailfish add excitement when conditions align perfectly.

Gear, boats, and techniques for each

The equipment divide between inshore vs offshore fishing runs deeper than just rod size. Your boat choice, tackle selection, and fishing methods adapt completely to the environment you’re targeting. Understanding these differences prevents gear mismatches that limit your success and helps you pack appropriately for your charter.

Inshore setup and methods

Bay boats and flats skiffs dominate inshore fishing, with shallow drafts that navigate skinny water without disturbing fish. You’ll use medium-action spinning rods paired with 10 to 20-pound test line that handles structure without being too heavy for finesse presentations. Live shrimp, pilchards, and artificial lures like soft plastics and spoons produce consistent results when worked around grass beds and oyster bars.

Casting accuracy matters more than distance in tight spaces around docks and mangroves. You’ll employ sight fishing, drift fishing, and anchored presentations depending on conditions and target species. The ability to move quickly between spots makes inshore fishing a mobile, active style where you’re constantly searching.

"Inshore gear focuses on finesse and accuracy, while offshore equipment emphasizes power and durability for battling larger species."

Offshore equipment and approaches

Center console boats and sportfishing yachts provide the stability and range needed for Gulf expeditions, with larger engines that cover distance quickly. You’ll fish with heavy conventional reels mounted on stout rods rated for 30 to 80-pound line that can pull grouper from reefs and subdue powerful amberjack. Live bait, cut bait, and trolled lures target different depths and species across varying techniques.

Bottom fishing with heavy weights reaches structure in 100-plus feet, while trolling covers water to locate pelagic species. Your captain uses downriggers, planers, and specific rigging methods that maximize hookups in deep water where fish have room to run.

How to choose the right trip for your group

Your group’s composition determines whether inshore vs offshore fishing delivers the better experience. Assess everyone’s physical condition, previous fishing experience, and expectations before booking. A group split between beginners and veterans needs different planning than a crew of experienced anglers chasing trophy fish.

Consider experience levels and comfort

First-time anglers and families with young children benefit from inshore trips that stay calm and accessible. The protected waters reduce seasickness concerns while providing consistent action that keeps everyone engaged. You’ll spend more time fishing and less time traveling, which matters when attention spans vary across your group.

Experienced anglers seeking larger species and serious challenges should commit to offshore expeditions despite the rougher conditions. Your group needs the physical stamina to handle extended periods on open water and the patience to endure longer runs between fishing spots.

"Your least experienced angler should guide your decision, not your most skilled one, to ensure everyone enjoys the trip."

Match your timeline and budget

Half-day inshore trips work perfectly for visitors with packed vacation schedules or those testing fishing before committing to longer charters. You’ll return by lunch with enough energy for afternoon activities, and the lower cost lets you book multiple trips during your stay.

Full-day offshore adventures require dedicating an entire day and accepting higher expenses for fuel and gear. Book these trips when your group prioritizes the catch over convenience and can handle the time investment required to reach productive Gulf waters. Consider your group’s consensus on spending more for bigger fish versus staying closer for guaranteed action.
inshore vs offshore fishing infographic

Wrap-up and next steps

The choice between inshore vs offshore fishing comes down to your group’s experience, budget, and target species. Inshore trips deliver consistent action in calm waters with lower costs and shorter durations, making them perfect for families and first-time anglers exploring Destin’s protected bays and flats. Offshore adventures require more time and investment but reward you with larger species and the thrill of deep-water fishing in the Gulf of Mexico’s blue waters.

Your decision shapes your entire Destin fishing experience, from the boat you’ll board to the techniques you’ll learn on the water. Consider everyone’s comfort level, physical stamina, and expectations when choosing between these two distinct fishing styles that define the Emerald Coast’s diverse opportunities.

Ready to experience world-class fishing along Florida’s coast? Original Crab Island offers guided fishing charters that put you on the water with experienced captains who know exactly where the fish are biting. Book your Destin fishing adventure today and create memories that last a lifetime.

How To Drive A Pontoon Boat Step By Step: Beginner Guide

Stepping onto a pontoon boat for the first time can feel intimidating, especially when you’re handed the keys and expected to navigate open water. But here’s the good news: learning how to drive a pontoon boat step by step is genuinely straightforward, and these flat-decked vessels are among the most forgiving boats for beginners. At Original Crab Island, we put first-time captains behind the wheel every day on our Destin pontoon rentals, and we’ve seen just how quickly people go from nervous to confident.

Whether you’re planning to cruise out to Crab Island, explore the Emerald Coast with family, or simply enjoy a relaxed afternoon on the water, understanding the basics before you go makes the experience far more enjoyable. You don’t need prior boating experience, just a willingness to learn and respect for the water.

This guide breaks down everything you need to know: from pre-departure checks and starting the engine to steering, docking, and following basic rules of the waterway. By the end, you’ll have the practical knowledge to handle a pontoon boat with confidence on your next trip to Destin.

Before you start: prep, safety, and basic terms

Before you turn the key, you need to understand what makes a pontoon boat tick and what keeps everyone aboard safe. Learning how to drive a pontoon boat step by step starts well before you touch the throttle. You’ll want to familiarize yourself with basic safety equipment, essential terminology, and a quick pre-departure checklist that takes just minutes but prevents hours of headaches on the water.

Essential safety gear and documents

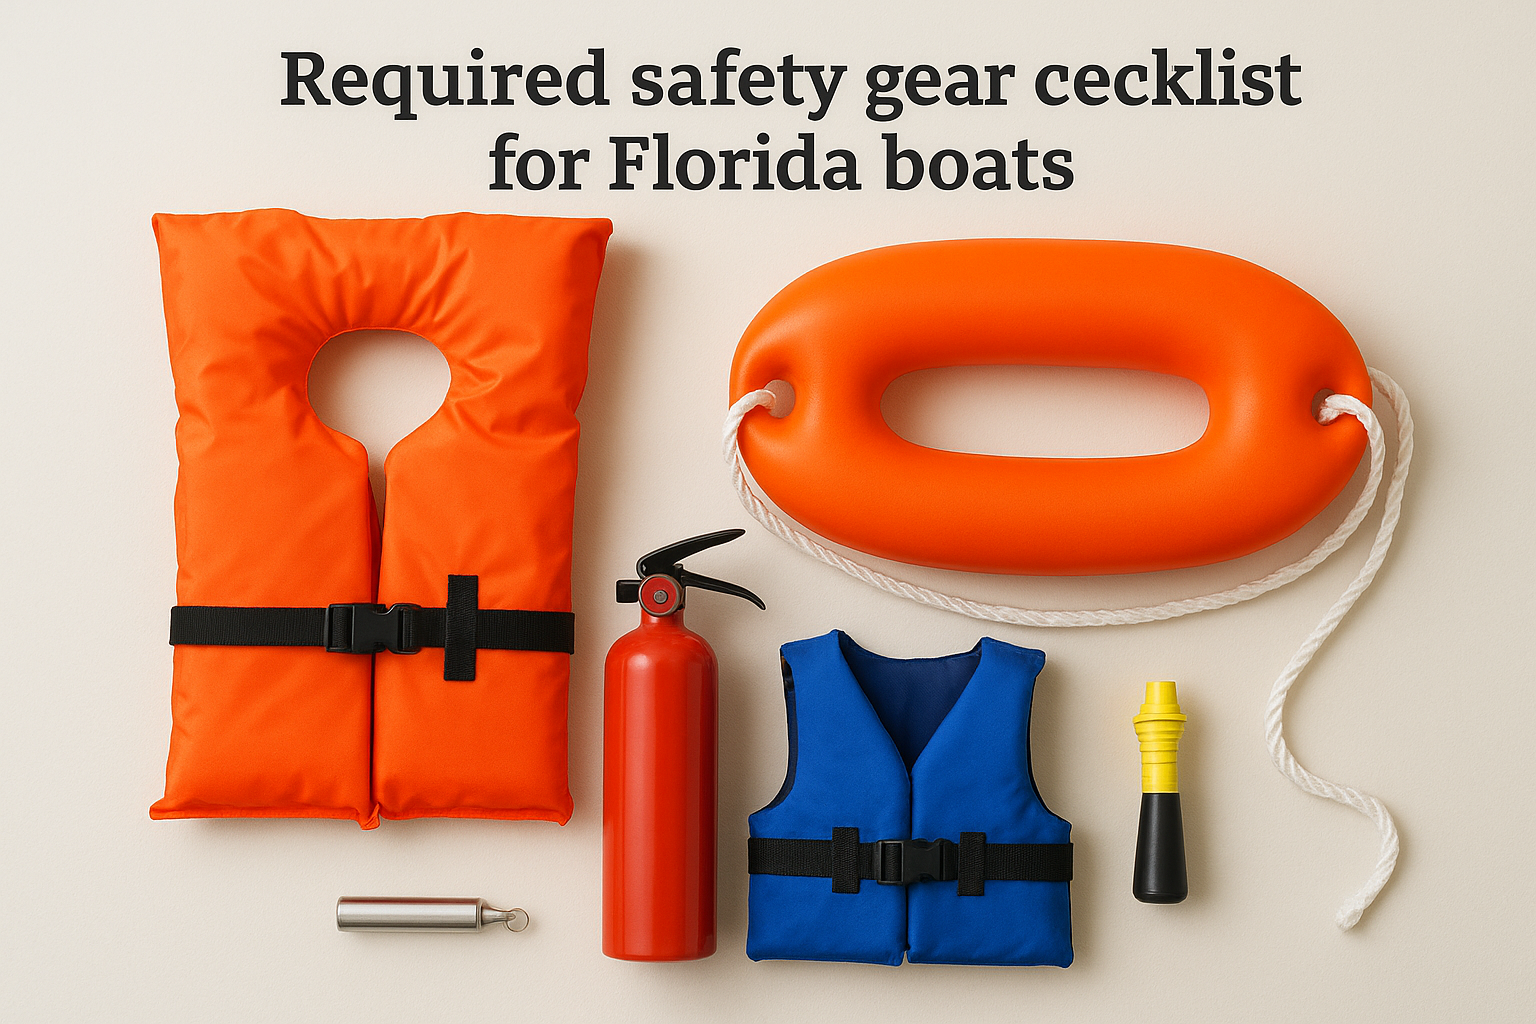
Your pontoon boat must carry specific safety equipment required by the U.S. Coast Guard. You need one properly fitted life jacket for every person aboard, plus a throwable flotation device like a cushion or ring buoy. Check that your fire extinguisher is charged and accessible, especially since you’re operating a vessel with a motor and fuel system. Sound-producing devices (a horn or whistle) are mandatory for signaling other boats.

Rental companies typically handle this for you, but if you’re operating a personal boat or borrowed vessel, you must verify everything is aboard. Beyond gear, confirm that the boat registration is current and displayed properly. You also need to know who’s legally allowed to drive: many states require boaters to complete a safety course and carry a boater education card on the water.

Always verify that all required safety equipment is present and functional before leaving the dock.

Basic pontoon terminology you need to know

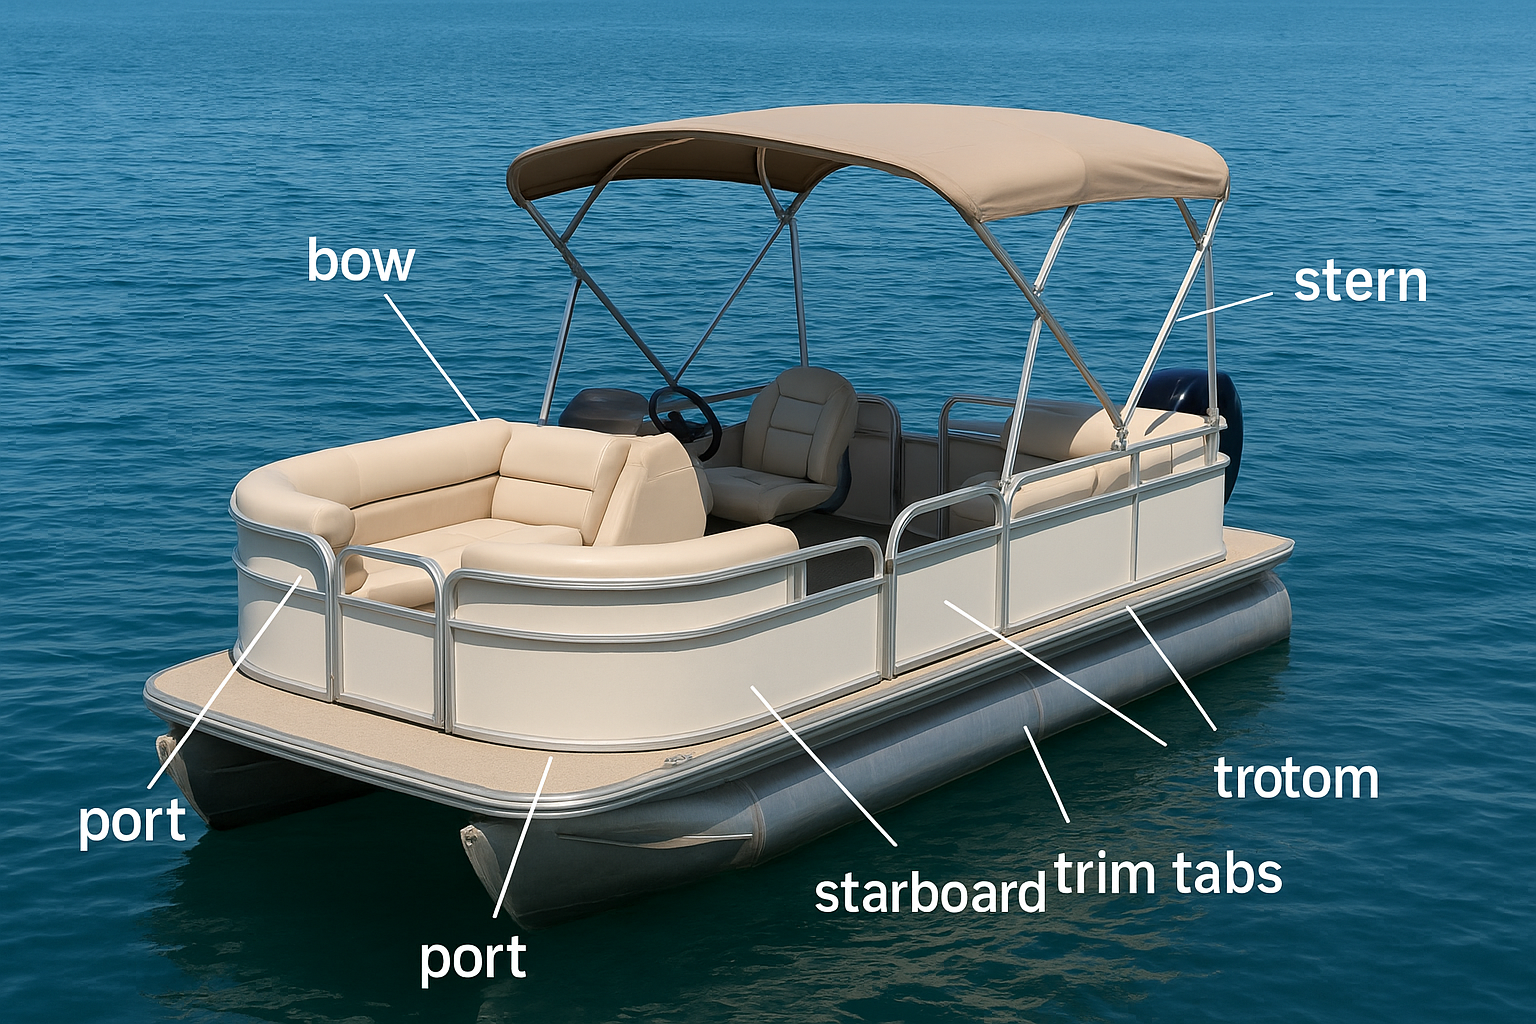
Understanding boat language helps you communicate clearly and follow instructions from dock staff or other boaters. The bow is the front of your pontoon, while the stern is the back. When you face forward, port refers to your left side and starboard means your right. These terms stay consistent regardless of which way you turn.

Basic pontoon terminology you need to know

The helm is your driving station where the steering wheel and controls sit. Your throttle controls engine speed and sits near the wheel, usually as a push-forward lever. The trim tabs or engine trim adjust your boat’s angle in the water for optimal performance. Most pontoons feature outboard motors mounted at the stern, though some larger models use sterndrive or inboard engines.

Pre-departure visual checks

Walk around your pontoon before starting the engine. Look for any obvious damage to the tubes (the aluminum pontoons underneath), loose railings, or anything that seems out of place. Check that your battery is connected and the fuel tank shows adequate levels for your planned trip.

Make sure all loose items are secured and nothing will slide around once you’re moving. Verify that your anchor and line are properly stowed but accessible. Confirm that drain plugs are tight and you’re not taking on water. These quick visual checks take under five minutes but catch problems while you’re still safely tied to the dock:

  • Inspect pontoon tubes for dents or damage
  • Verify battery connections are tight
  • Check fuel level and oil (if applicable)
  • Ensure drain plugs are secure
  • Confirm anchor is aboard and line is coiled
  • Check that steering wheel turns freely
  • Look for any loose equipment or trash

Step 1. Start the boat and run quick checks

Now that you understand the basics, it’s time to bring your pontoon to life. Starting the engine is the first physical step in learning how to drive a pontoon boat step by step, and the process follows a simple sequence that you’ll repeat every time you go out. You need to start the blower motor first (if your boat has one), verify all systems respond correctly, and confirm that your engine fires up without issues before you untie a single line.

Starting the engine properly

Locate your ignition key at the helm and check that the throttle sits in neutral. Most pontoons feature a clear neutral position marked on the control panel. Before turning the key, you must run the blower motor for at least four minutes if your boat has an enclosed engine compartment or uses an inboard motor. This ventilates any fuel vapors that could ignite when you start the engine.

Turn the key to the "on" position and watch your gauge cluster light up. You should see readings for fuel level, battery voltage, and engine hours. Now turn the key fully to engage the starter. Your outboard motor should fire up within a few seconds and settle into a steady idle around 600-800 RPM. If the engine doesn’t start immediately, wait 10 seconds before trying again to avoid flooding it.

Always run your blower for the full required time before starting the engine to prevent explosive fuel vapor buildup.

Verify all systems work

Once your engine runs smoothly, check that your steering responds by turning the wheel fully left and right. You should feel resistance but smooth movement throughout the entire range. Test your horn or sound device to confirm it works. Glance at your gauges again and verify that oil pressure (if equipped) reads normal and your battery shows adequate charge.

Check your navigation lights if you plan to be out near dusk, and verify that your bilge pump activates when you flip its switch. These quick functional checks take under 30 seconds but catch electrical problems before you leave the safety of the dock.

Step 2. Pull away from the dock and idle out

How To Drive A Pontoon Boat Step By Step: Beginner Guide

Getting away from the dock is where your practical boat handling truly begins. This step in learning how to drive a pontoon boat step by step requires coordination between your hands and your spatial awareness. You need to understand how your boat responds to throttle input and steering while moving at slow speeds, and you must clear the dock area without hitting other vessels, pilings, or the dock itself. Your pontoon handles differently than a car, so expect a learning curve as you get used to the way it drifts and turns.

Untie lines and push off correctly

Have your passengers remain seated while you prepare to depart. Untie the stern line first, then move to the bow and release that line. If wind or current pushes your boat against the dock, you may need someone to physically push the bow away from the dock as you step aboard. Never try to use your engine’s power to pull away while still tied up, as this strains your cleats and could damage both boat and dock.

Once all lines are free and coiled on deck, use your hands or a boat hook to push off gently from the dock. Create at least two feet of clearance between your boat and any fixed objects before you touch the throttle. If other boats sit close by, take extra time to ensure you have room to maneuver without contact.

Engage forward gear and idle out slowly

Place your hand on the throttle lever and push it forward gently until you feel it click into forward gear. Your engine will engage with a subtle clunk, and the boat will begin moving ahead slowly. Keep your throttle at idle speed (the lowest forward position) as you navigate away from the dock area.

Your pontoon turns wide, so start steering early if you need to avoid obstacles. Point your bow toward open water and maintain idle speed until you clear all no-wake zones, docks, and moored boats. Watch behind you occasionally to ensure your stern clears everything as you turn:

  • Push throttle forward one click into gear
  • Keep RPMs under 1000 in congested areas
  • Steer gradually and anticipate wide turns
  • Watch both bow and stern clearance
  • Maintain idle until you reach open water

Always idle out slowly through congested dock areas and no-wake zones to maintain full control and avoid creating damaging wakes.

Step 3. Drive safely in open water and follow rules

Once you clear the no-wake zone, you can accelerate and truly experience what makes how to drive a pontoon boat step by step such an accessible skill. Open water driving requires you to balance speed with awareness, maintain proper lookout, and follow basic navigation rules that prevent collisions. Your pontoon handles predictably at cruising speeds, but you need to understand how wind, waves, and current affect your course. You also must respect other boaters by following established right-of-way rules and maintaining safe distances.

Understanding throttle and steering control

Push your throttle forward gradually to increase speed. Your pontoon accelerates smoothly, and most models cruise comfortably between 15 and 25 miles per hour. Avoid jamming the throttle to full power immediately, as this creates unnecessary strain on your engine and wastes fuel. Find a comfortable cruising speed where your boat planes efficiently and feels stable.

Steering requires a gentle touch at speed. Your pontoon responds more quickly than when idling, so make small steering corrections rather than large wheel movements. If you need to turn sharply, reduce your speed first to prevent passengers from sliding across the deck. When crossing wakes from other boats, slow down and approach them at a 45-degree angle to minimize the impact.

Navigation rules and right-of-way

Boats approaching head-on must both turn to starboard (right) to pass port-to-port, just like cars passing on a two-lane road. When two boats approach at an angle, the vessel on your starboard side has right-of-way, meaning you must slow down or alter course to pass behind them. Sailboats, kayaks, and paddleboards always have right-of-way over powerboats.

Navigation rules and right-of-way

Always give sailboats, human-powered vessels, and boats restricted in their ability to maneuver the right-of-way, regardless of your position.

Maintain a safe distance from other boats, swimmers, and fixed objects. Keep at least 100 feet from divers-down flags and stay clear of fishing lines. Watch constantly for hazards like floating debris, shallow water markers, and sudden weather changes.

Step 4. Return, dock, tie up, and shut down

Returning to the dock completes your journey and tests your ability to control your boat at slow speeds in tight spaces. This final step in learning how to drive a pontoon boat step by step requires patience and precision, as you reverse the departure process while accounting for wind and current. Your goal is to bring your boat alongside the dock smoothly without bumping or scraping, secure it properly with dock lines, and shut down all systems safely. Rushing this step causes most docking accidents, so take your time and don’t let onlookers pressure you into moving faster than feels comfortable.

Approach the dock at idle speed

Slow to idle speed well before you reach the dock area. Position your boat to approach at a 30 to 45-degree angle to the dock, aiming your bow toward where you want to end up. Watch how wind and current push your boat and compensate by steering slightly into them. When you get within 10 feet of the dock, shift into neutral and let your momentum carry you the rest of the way.

If you come in too fast, shift into reverse briefly to slow yourself down. Your stern will swing wide when you reverse, so account for this. Have a passenger ready with fenders positioned between your boat and the dock to prevent scratches. Once alongside, shift immediately to neutral and let someone step off to hold the boat steady.

Approach every dock at idle speed with neutral gear ready, as momentum carries your heavy pontoon further than you expect.

Secure dock lines and shut down

Tie your bow line first by looping it around a dock cleat in a figure-eight pattern and securing it with a half hitch. Then secure your stern line the same way. Your lines should hold the boat snug against the dock without being overtight, allowing for minor water level changes. Cross your lines if possible for added stability:

  • Loop line around cleat base in figure-eight
  • Pull tight to remove slack
  • Finish with half hitch over the top
  • Check that knot holds firm

Turn your ignition key to the off position and remove it. Switch off all electronics, lights, and accessories to preserve battery power. Raise your outboard motor if in shallow water or if instructed by dock staff. Check that you’ve removed all trash and personal items before leaving.

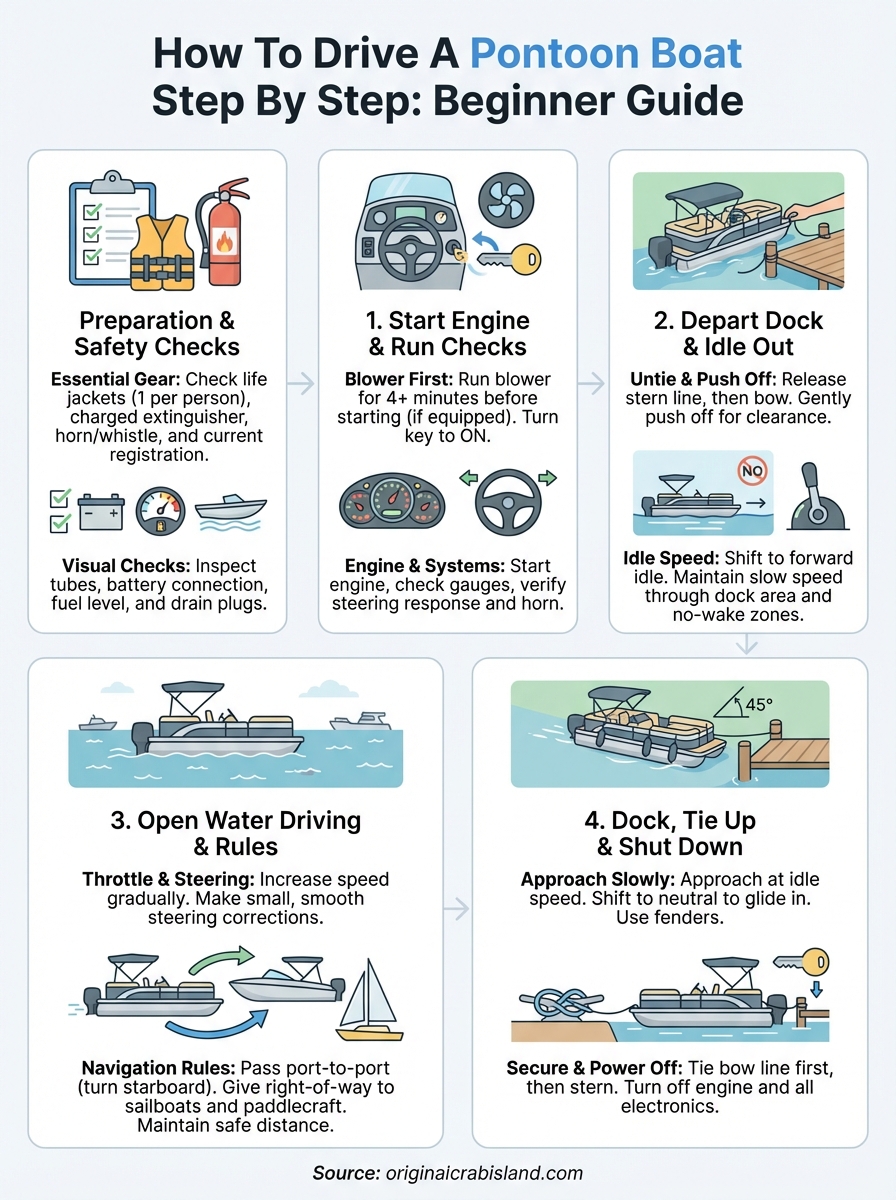
how to drive a pontoon boat step by step infographic

Quick recap before you go

You now understand how to drive a pontoon boat step by step, from starting your engine and checking safety equipment to navigating open water and docking confidently. The process becomes second nature after just one or two trips, and pontoons remain the most forgiving boats for beginners to learn on. Remember to always run your blower before starting, idle through no-wake zones, maintain proper lookout in open water, and approach docks slowly with neutral gear ready.

Your first solo drive might feel nerve-wracking, but trust the process you’ve learned here. Focus on smooth, gradual movements rather than sudden throttle changes, and you’ll handle your boat like you’ve been doing it for years. Ready to put these skills to work? Experience Crab Island with Original Crab Island on one of our well-maintained pontoon rentals, where you’ll get hands-on support from our team before heading out to explore Destin’s most famous sandbar.

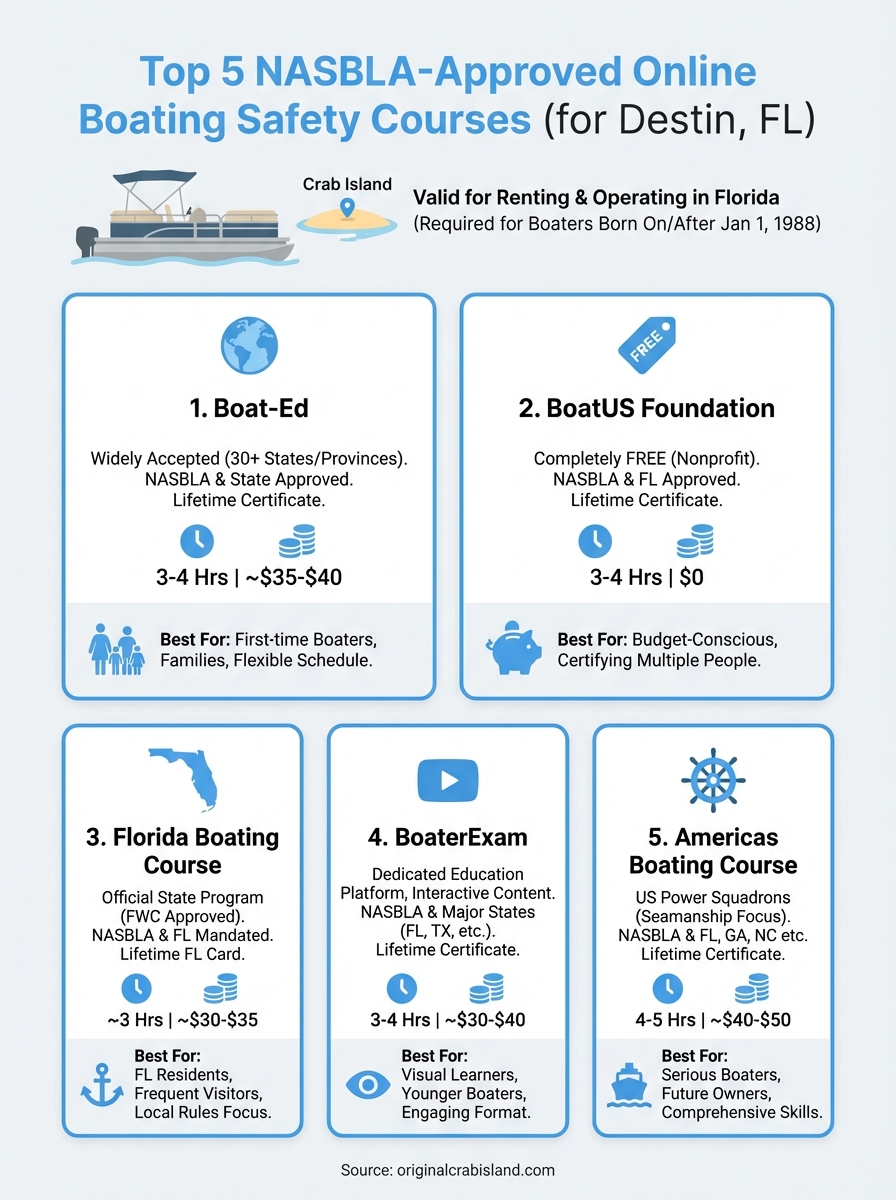
5 NASBLA Approved Boating Safety Course Picks To Take Online

Planning to hit the water in Destin and explore Crab Island by boat? Before you hop on a pontoon or jet ski rental, you’ll likely need to complete a NASBLA approved boating safety course. Most states, including Florida, require boaters born after a certain date to carry proof of boating education, and NASBLA-approved courses satisfy those legal requirements.

At Original Crab Island, we see visitors every day who are eager to get out on the water but realize they need their certification first. The good news? You can complete your course entirely online, often in just a few hours, and have your certificate ready before your vacation even starts.

This guide covers five trusted online options that’ll get you certified and ready to rent a boat, drive a jet ski, or enjoy Florida waters legally and confidently.

5 NASBLA Approved Boating Safety Course Picks To Take Online

1. Boat-Ed

Boat-Ed is one of the most widely accepted online boating safety courses in North America. As a NASBLA approved boating safety course, it meets the legal requirements for over 30 states and provinces, making it a reliable choice if you’re traveling across state lines or planning to boat in multiple locations. The platform has trained over 3 million boaters and maintains a straightforward, user-friendly interface that works on any device.

1. Boat-Ed

NASBLA and state approval coverage

You can use Boat-Ed to satisfy boating education requirements in states like Florida, Texas, California, Virginia, North Carolina, and many others. Each state has specific age requirements for who needs certification, but Boat-Ed adjusts the course content to match your state’s regulations automatically. The certificate you earn is valid for life in most states and carries the same weight as an in-person class.

What you get after you pass

After you pass the final exam, you’ll receive a temporary certificate immediately that you can print or save on your phone. Your official plastic card arrives by mail within 3 to 5 business days, depending on your location. Both versions are legally valid and accepted by law enforcement, rental companies, and marinas across participating states.

How the online course works

The course divides into chapters covering topics like navigation rules, safety equipment, legal requirements, and emergency procedures. You can pause and resume anytime, making it easy to fit around your schedule. Each chapter ends with a short quiz, and you’ll take a final exam at the end that requires a passing score of 80% or higher.

Who this course fits best

Boat-Ed works well for first-time boaters who need certification quickly and prefer learning at their own pace. It’s also ideal for families since you can complete the course from home before your vacation. The interface is simple enough for younger boaters while still covering all the technical details experienced water users appreciate.

Typical cost and time to finish

The course costs around $35 to $40 depending on your state, which includes the exam and certificate. Most people finish in 3 to 4 hours, though you can spread that time across multiple sessions.

"The flexibility to stop and start made it easy to fit the course into my busy schedule before our Destin trip."

2. BoatUS Foundation online boating safety course

The BoatUS Foundation offers a completely free NASBLA approved boating safety course that meets legal requirements in multiple states. This nonprofit has educated over 700,000 boaters and maintains partnerships with state agencies nationwide. The course covers the same material as paid options while removing the financial barrier.

NASBLA and state approval coverage

You can use this course in Florida, Alabama, Connecticut, Delaware, and several other states. The foundation updates content regularly to reflect current boating laws and safety standards.

What you get after you pass

Your temporary certificate is available immediately after passing, and you can print or download it. A durable wallet-sized card arrives by mail within 3 to 5 weeks at no cost.

How the online course works

The course divides into bite-sized modules covering navigation, equipment, weather, and emergency procedures. You’ll complete practice quizzes throughout and take a proctored final exam requiring 80% to pass.

"Getting certified for free through BoatUS made it easy to prepare multiple family members for our Crab Island adventure."

Who this course fits best

This option works best for budget-conscious boaters who want quality education without spending money. It’s also excellent for families certifying multiple people at once.

Typical cost and time to finish

The entire course is completely free, including exam and certificate. Most users finish in 3 to 4 hours.

3. Florida Boating Course

The Florida Boating Course serves as the official state-mandated program for Florida residents and visitors. As a NASBLA approved boating safety course, it focuses specifically on Florida’s waterways, regulations, and unique boating conditions. The Florida Fish and Wildlife Conservation Commission approves this course, making it the most direct path to legal compliance if you’re boating in Destin or anywhere across the Sunshine State.

3. Florida Boating Course

NASBLA and state approval coverage

This course meets Florida’s mandatory education requirements for anyone born on or after January 1, 1988. Your certificate remains valid across all Florida waters, from the Gulf Coast to inland lakes. While designed for Florida, many other states accept it through reciprocity agreements.

What you get after you pass

You’ll receive a temporary certificate immediately that’s valid until your permanent card arrives. Florida issues a lifetime boating safety identification card by mail within 2 to 3 weeks.

How the online course works

The course covers Florida-specific navigation rules, local wildlife regulations, and safety equipment requirements. You’ll complete chapter-by-chapter assessments before taking a final exam that requires 80% to pass.

Who this course fits best

Florida residents and frequent Destin visitors benefit most since the content focuses on local conditions and regulations. It’s perfect if you’re planning to rent boats regularly at Crab Island.

"Learning Florida-specific rules helped me navigate Destin’s busy harbor with confidence."

Typical cost and time to finish

The course costs around $30 to $35 and takes approximately 3 hours to complete.

4. BoaterExam

BoaterExam operates as a dedicated boating education platform across the United States and Canada. This NASBLA approved boating safety course provider has certified over 1 million boaters since launching and maintains approval in more than 30 states. The platform focuses exclusively on boating education, which shows in the detailed course content and responsive customer support.

NASBLA and state approval coverage

Your BoaterExam certificate works in major boating states including Florida, Texas, Maryland, New York, and Washington. The course automatically adjusts to your state’s specific requirements and legal standards.

What you get after you pass

You’ll receive an instant temporary certificate after passing the final exam. A permanent plastic card arrives by mail within 3 to 5 business days, valid for your lifetime.

How the online course works

The course breaks down into interactive modules with videos, animations, and practice questions. You’ll take a final exam requiring 80% or higher to pass, with unlimited retakes if needed.

Who this course fits best

BoaterExam suits visual learners who prefer interactive content over text-heavy material. The platform works well for younger boaters due to its engaging format.

"The interactive videos made learning navigation rules much easier than just reading text."

Typical cost and time to finish

The course costs approximately $30 to $40 and takes 3 to 4 hours to complete.

5. Americas Boating Course

Americas Boating Course runs through the United States Power Squadrons, a nonprofit organization with over a century of boating education experience. This NASBLA approved boating safety course carries approval in multiple states and combines traditional nautical knowledge with modern safety practices. The program emphasizes hands-on skills and real-world scenarios that prepare you for actual boating conditions.

NASBLA and state approval coverage

Your certificate works in Florida, Georgia, North Carolina, and several other coastal states. The United States Power Squadrons maintains partnerships with state agencies to ensure the course meets current legal standards.

What you get after you pass

You’ll receive a temporary certificate immediately after passing. Your official card arrives by mail within 2 to 4 weeks and remains valid for life.

How the online course works

The course covers navigation, seamanship, weather patterns, and emergency procedures through interactive lessons. You’ll complete a final exam requiring 80% to pass with unlimited attempts available.

Who this course fits best

This option suits serious boaters who want comprehensive education beyond minimum requirements. The detailed content appeals to those planning to own boats rather than just rent occasionally.

"The depth of seamanship training gave me confidence handling our pontoon in different weather conditions at Crab Island."

Typical cost and time to finish

The course costs around $40 to $50 and takes 4 to 5 hours to complete.

nasbla approved boating safety course infographic

Next steps

Completing your NASBLA approved boating safety course takes just a few hours and opens up endless possibilities on Florida’s waters. You can choose any of these five options based on your budget, timeline, and learning style. Once you finish, you’ll have your certificate ready to present at any rental facility or when authorities request it on the water.

Your certification remains valid for life in most states, so you’ll only need to take the course once. Download or print your temporary certificate immediately after passing, then keep your permanent card with you whenever you’re operating a boat or jet ski.

Ready to put your new certification to use? Explore Crab Island with one of our pontoon boat rentals and experience the crystal-clear waters of Destin firsthand. We provide top-quality equipment and local knowledge to help you make the most of your time on the Emerald Coast.

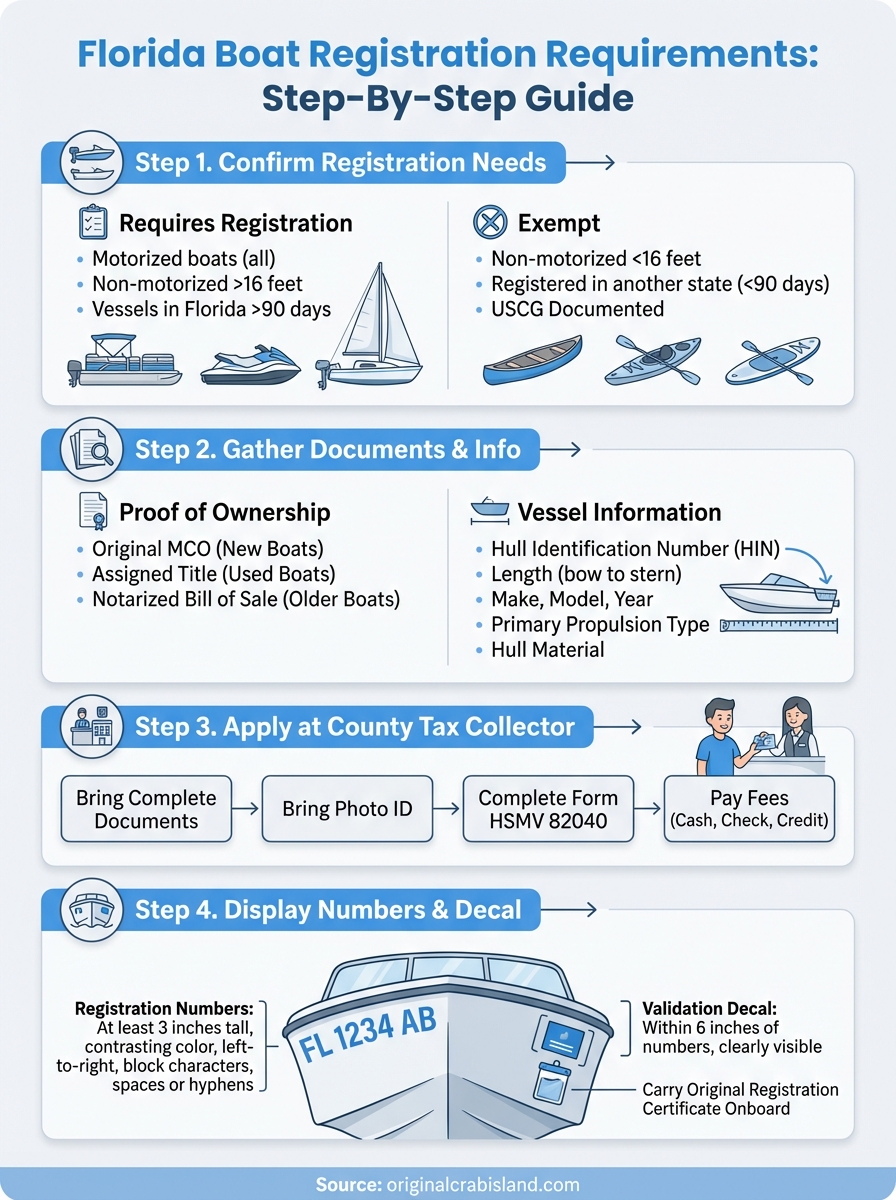
Florida Boat Registration Requirements: Step-By-Step Guide

Whether you’re buying your first vessel or relocating a boat to the Sunshine State, understanding Florida boat registration requirements is essential before you can legally cruise the Gulf. Florida law requires most motorized watercraft, and even some non-motorized ones, to be registered with the state. Skipping this step can lead to fines and put a serious damper on your time on the water.

At Original Crab Island, we spend every day helping visitors explore Destin’s emerald waters through our rental fleet. But we also know that many guests fall in love with Florida boating and eventually decide to buy their own vessel. That’s exactly why we put together this guide, to help you navigate the process with confidence.

Below, you’ll find a complete breakdown of which boats need registration, the proof of ownership documents you’ll need, current fee structures, and the step-by-step process for filing with your county tax collector. By the end, you’ll have everything you need to get your boat legally registered and ready for the water.

What you need to know before you apply

Florida handles boat registration through your local county tax collector’s office, not through a centralized state agency. This means you’ll visit (or mail documents to) the tax collector in the county where you primarily keep or use your boat. You can’t complete the florida boat registration requirements online in most counties, so plan for an in-person visit or prepare to mail your application.

Who handles your application

Each of Florida’s 67 counties operates independently when processing boat registrations. Your county tax collector will review your paperwork, collect fees, and issue your registration certificate and decal. Some larger counties like Miami-Dade or Hillsborough offer appointments, while smaller counties work on a walk-in basis. Call ahead to confirm office hours and whether you need to schedule a visit.

Florida requires you to register your boat in the county where it’s principally used or stored, not necessarily where you live.

What registration costs

Registration fees depend on your boat’s length, not its value or type. Florida charges a base registration fee that ranges from $5.50 for vessels under 12 feet to $102.50 for boats 40 feet and longer. You’ll also pay a $6.75 title fee if your boat requires titling (most motorized vessels do). Additional charges may include a $2.50 agent fee for processing and any applicable sales tax if you purchased the boat from a private seller or out-of-state dealer.

How long the process takes

Most counties process applications immediately if you bring complete paperwork during your visit. You’ll walk out with your registration certificate and validation decal the same day. Mail-in applications take longer, typically 10 to 15 business days from the date the tax collector receives your documents. Processing times increase during peak boating season from March through June.

Step 1. Confirm if your boat needs a title and registration

Florida law divides watercraft into two categories: those that require registration and those that don’t. Your first task is identifying which category applies to your vessel. Most motorized boats fall under registration requirements, but some non-motorized craft and specific use cases qualify for exemptions. Understanding these distinctions saves you time and ensures you don’t miss a required filing.

Vessels that require registration

You must register any motorized watercraft operated on Florida public waters, including rivers, lakes, and coastal areas. This applies to boats with inboard engines, outboard motors, or electric trolling motors. Non-motorized vessels longer than 16 feet also need registration if you use them on Florida waters. The florida boat registration requirements apply equally to residents and non-residents who keep their boats in the state for more than 90 consecutive days.

If your boat has any type of motor, even a small electric trolling motor, Florida requires registration.

Registration includes these common vessel types:

  • Pontoon boats and deck boats
  • Fishing boats with outboard motors
  • Personal watercraft (jet skis, wave runners)
  • Sailboats over 16 feet with auxiliary motors

Vessels exempt from registration

Non-motorized canoes, kayaks, and paddleboards under 16 feet don’t require registration in Florida. Other exemptions include boats already registered in another state (for the first 90 days), documented vessels with U.S. Coast Guard numbers, and ships’ lifeboats used only in emergencies.

Step 2. Gather the right paperwork and boat details

Before you visit your county tax collector, assemble all required documents and information about your boat. Missing even one piece of paperwork can delay your registration by weeks. The florida boat registration requirements demand specific proof of ownership, along with detailed vessel specifications that match official records. Preparing everything in advance makes your appointment quick and ensures first-time approval.

Proof of ownership documents

You need to prove you legally own the boat through original documents, not photocopies. Acceptable proof includes the Manufacturer’s Certificate of Origin (MCO) for new boats, a properly assigned title from the previous owner for used boats, or a notarized bill of sale if the boat is over 15 years old and has no existing title. Out-of-state titles must show clear transfer signatures and be accompanied by a completed Florida title application form.

Bring original documents to your appointment. Tax collectors won’t accept photocopies or digital screenshots of ownership papers.

Required vessel information

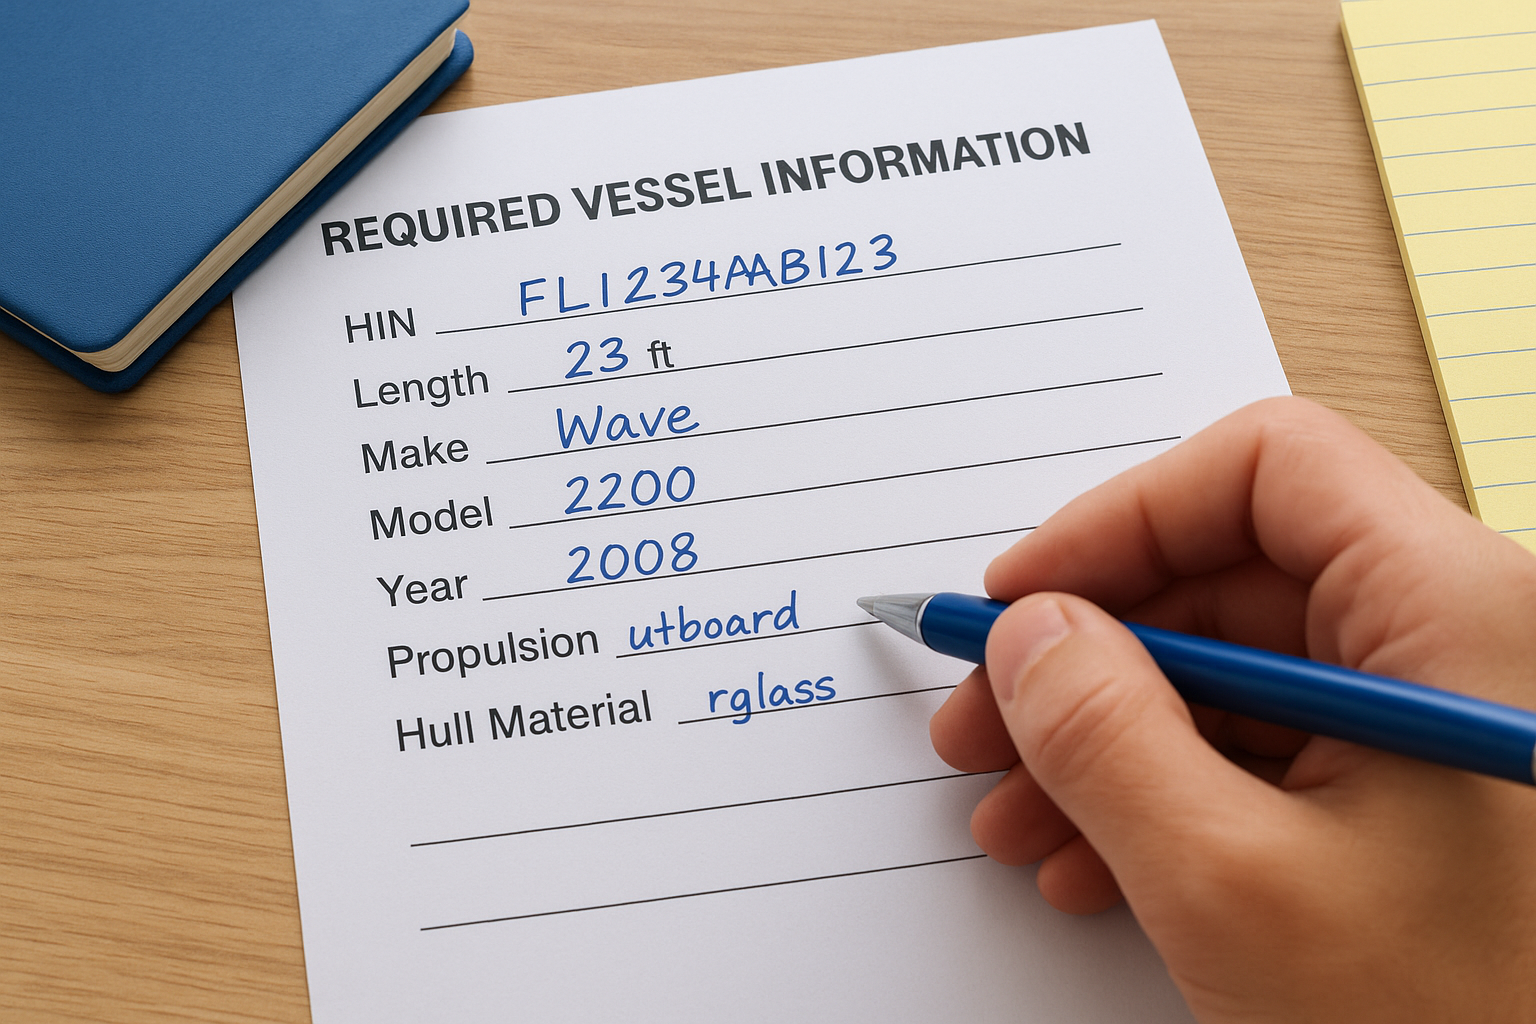
Write down your boat’s hull identification number (HIN) before your visit. This 12-character code appears on the transom’s upper right corner. You also need the exact length measured from bow to stern, the make and model, year of manufacture, primary propulsion type (outboard, inboard, sail), and hull material. Tax collectors verify this information against your ownership documents to complete your registration.

Required vessel information

Step 3. Apply through your county tax collector

Once you’ve gathered all documents and vessel information, schedule your visit to the county tax collector’s office where your boat will be primarily used. Most counties accept walk-ins, but calling ahead prevents unnecessary trips if the office has specific appointment requirements. Bring your [driver’s license or state ID](https://originalcrabisland.com/whats-the-minimum-age-license-required-to-drive-a-pontoon-boat-in-destin-florida/) along with all ownership documents and vessel details you compiled in Step 2.

What to bring to your appointment

Pack your complete document folder before leaving home. You need the original proof of ownership (MCO, title, or notarized bill of sale), your government-issued photo ID, and payment for all fees. Tax collectors accept cash, checks, and most major credit cards, though some smaller counties have card processing limitations. If someone else bought the boat for you as a gift, bring a notarized statement explaining the transaction to avoid sales tax questions.

How to complete your application

Florida Boat Registration Requirements: Step-By-Step Guide

The tax collector provides Form HSMV 82040, the Application for Certificate of Title and/or Vessel Registration. Fill out all sections completely, including owner information, vessel specifications, and purchase details. Review every line before submitting because errors require resubmission and delay your registration. The clerk verifies your documents match the application, processes your payment, and issues your registration certificate and validation decal immediately.

Most counties complete in-person registrations within 15 minutes if your paperwork is complete and accurate.

Step 4. Display your numbers, decals, and documents

After your county tax collector issues your registration, you need to properly display your registration numbers and decal on your boat before launching. The florida boat registration requirements don’t end with paperwork approval. Florida law specifies exact placement rules for numbers and decals, and you must carry specific documents onboard every time you operate your vessel. Incorrect display can result in citations even if your registration is current.

How to display registration numbers

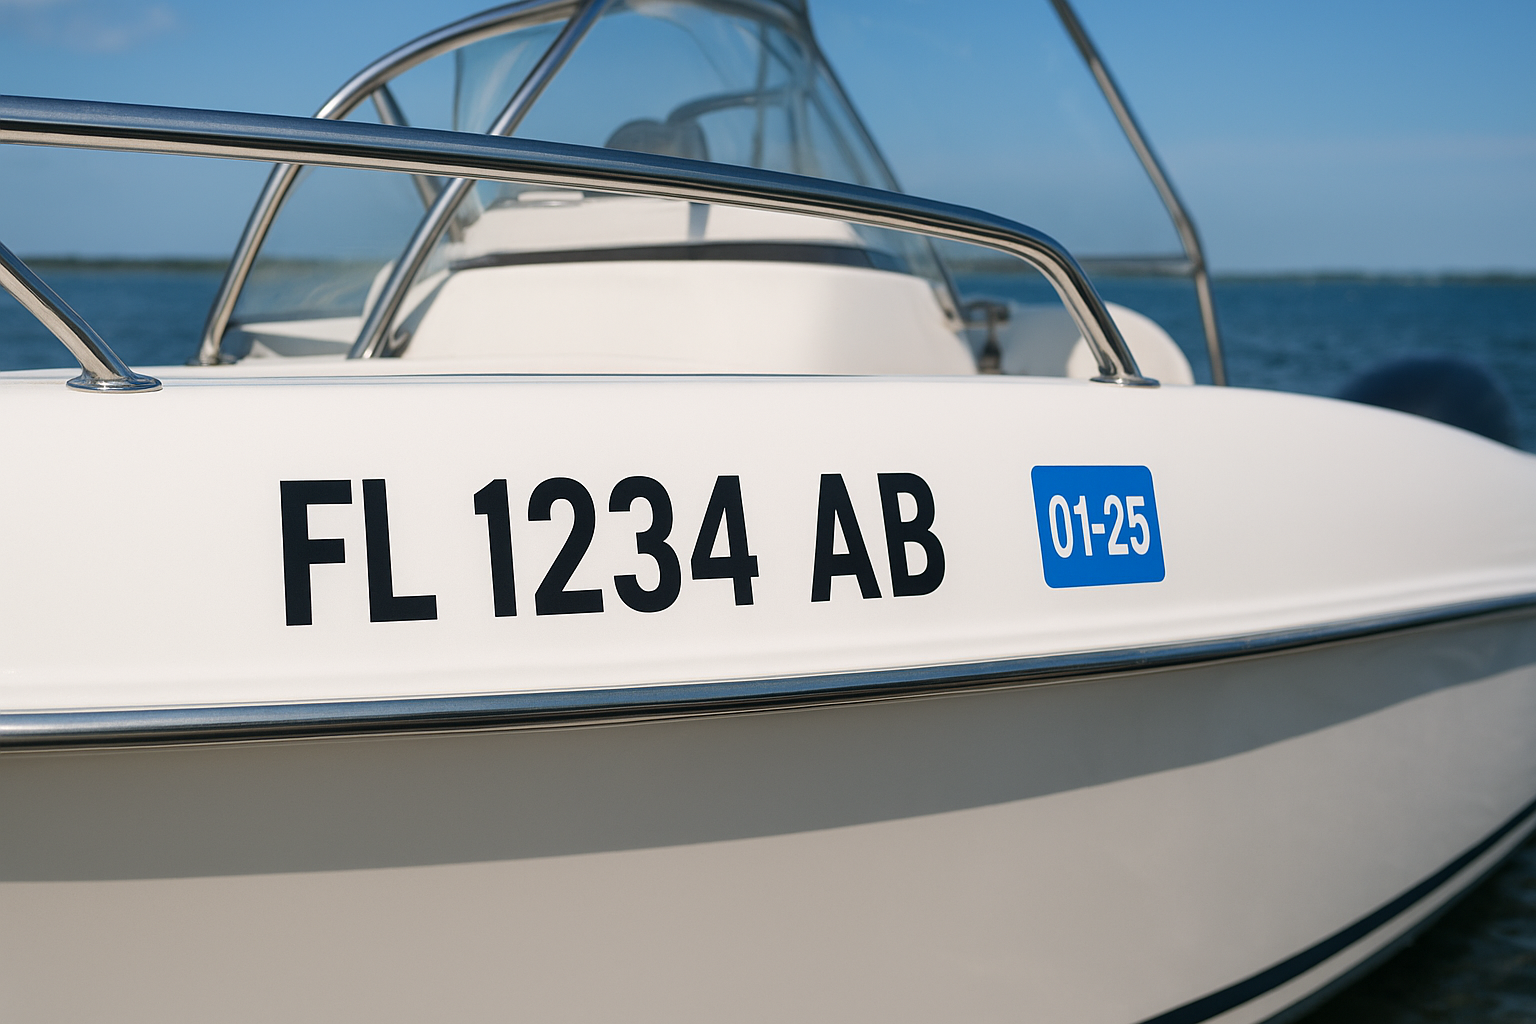
Paint or affix your assigned registration number on both sides of the bow (front) of your boat. Numbers must be at least three inches tall, read from left to right, and use block characters in a color that contrasts sharply with your hull. If your boat is white, use black numbers. Dark-hulled boats need white or light-colored numbers. Leave spaces or hyphens between the letter prefix, number sequence, and suffix exactly as shown on your registration certificate (example: FL 1234 AB).

How to display registration numbers

Where to place your validation decal

Attach your validation decal within six inches of your registration number on each side of the bow. The decal shows your registration expiration date and must remain clearly visible and legible at all times. Replace damaged or faded decals immediately by requesting duplicates from your county tax collector.

Your registration numbers and decals must stay visible and legible. Faded or peeling displays count as violations during safety checks.

Documents to carry onboard

Keep your original registration certificate on the boat whenever you operate it. Store it in a waterproof container or bag to prevent damage from spray and moisture. Law enforcement officers can request to see this certificate during routine safety inspections or traffic stops on the water.

florida boat registration requirements infographic

Before you head out on the water

You now have a complete understanding of the florida boat registration requirements, from gathering ownership documents to displaying your registration numbers correctly. The entire process takes minimal time when you arrive prepared with proper paperwork and accurate vessel information. Most boat owners complete their registration in a single visit to their county tax collector’s office and leave with everything needed to operate legally.

Florida’s waters offer incredible opportunities for exploration, fishing, and relaxation once your registration is complete. While you’re getting your own boat registered and ready for launch, consider experiencing what makes Destin special aboard one of our professionally maintained vessels. Rent a pontoon boat at Crab Island and discover why thousands of visitors return year after year to enjoy the emerald waters, shallow sandbars, and unmatched atmosphere that defines this destination. You’ll understand exactly why so many people decide to buy their own boats after experiencing everything this area offers.

Bachelor Party Checklist: Timeline, Budget, And Essentials

Planning a bachelor party comes with pressure, you want it to be memorable, but the logistics can get overwhelming fast. A solid bachelor party checklist takes the guesswork out of the equation and keeps you on track from first idea to final toast.

Whether you’re booking a beach getaway or a weekend adventure, this guide breaks down everything you need: a planning timeline, budget framework, guest coordination tips, and a packing list that covers the essentials. Here at Original Crab Island in Destin, Florida, we’ve helped countless groups pull off unforgettable bachelor parties on the water, from pontoon cruises and jet ski rentals to fishing charters, so we know what goes into making these trips run smoothly.

Below, you’ll find a step-by-step roadmap to organize a bachelor party that delivers without the last-minute scramble.

What you need before you start

Before you open your bachelor party checklist, you need to collect the right information and get the right people aligned. This prep work saves you from backtracking later, whether you’re booking activities at Original Crab Island or coordinating a multi-day trip. Start with a clear understanding of the groom’s preferences, your guest list size, and who’s handling the money.

Core information and preferences

You need three key inputs before you can plan effectively: the groom’s availability (specific weekends or months that work), his activity preferences (adventure-heavy, relaxed, or a mix), and any hard no’s he’s mentioned (heights, certain foods, early mornings). Talk to him directly or check with the best man if you’re keeping it a surprise. Write down travel restrictions for guests (anyone with kids, tight budgets, or travel limitations), since this shapes your destination and timeline.

Gathering preferences upfront prevents you from booking a fishing charter for someone who gets seasick or scheduling a trip when half the crew can’t attend.

Create a simple info doc with these fields: groom’s available dates, activity wishlist, guest count estimate, budget range per person, and any known conflicts. Share this with your core planning team (usually 2 to 3 people) so everyone works from the same baseline.

Decision makers and money handler

Bachelor Party Checklist: Timeline, Budget, And Essentials

Assign one person to handle money early, ideally someone organized who can track payments and send reminders without awkwardness. This person collects deposits, pays vendors, and manages refunds if plans shift. You also need one final decision maker (usually the best man) to break ties when the group debates locations or activities. Clear roles prevent the "too many cooks" problem that derails planning momentum.

Step 1. Build the timeline and lock the date

You need to secure your date before anything else on your bachelor party checklist moves forward. Start this process 4 to 6 months before the wedding for out-of-town trips or 6 to 8 weeks for local celebrations. The timeline dictates when you book activities, collect deposits, and finalize guest lists, so getting alignment here prevents domino delays later.

Working backward from the wedding

Pick your bachelor party date by working backward from the wedding date, leaving at least 2 weeks of buffer so the groom isn’t recovering from sunburn or exhaustion during his big day. Most groups schedule trips 1 to 2 months before the wedding to avoid last-minute wedding tasks. Send a poll with 3 to 4 date options to your core group (groomsmen and close friends) and set a 72-hour deadline for responses. Use the date that captures the most availability, not unanimous approval.

Locking the date early gives you leverage on pricing and availability for rentals, lodging, and activities like pontoon bookings at Original Crab Island.

Getting commitment in writing

Once you pick the date, send a calendar invite with the full weekend itinerary outline (even if details are pending) and request a reply confirmation. This creates accountability and surfaces conflicts before you start spending money.

Step 2. Set the budget and collect money fast

Money conversations kill momentum if you drag them out, so your bachelor party checklist needs a clear budget number and a fast collection system. You want everyone to commit financially within 7 to 10 days of locking the date, which means presenting a transparent breakdown and making payment frictionless. Calculate your total estimated cost, divide by guest count, and add a 10% buffer for unexpected expenses (extra drinks, gear damage deposits, or last-minute activity add-ons).

Calculate per-person costs with a breakdown

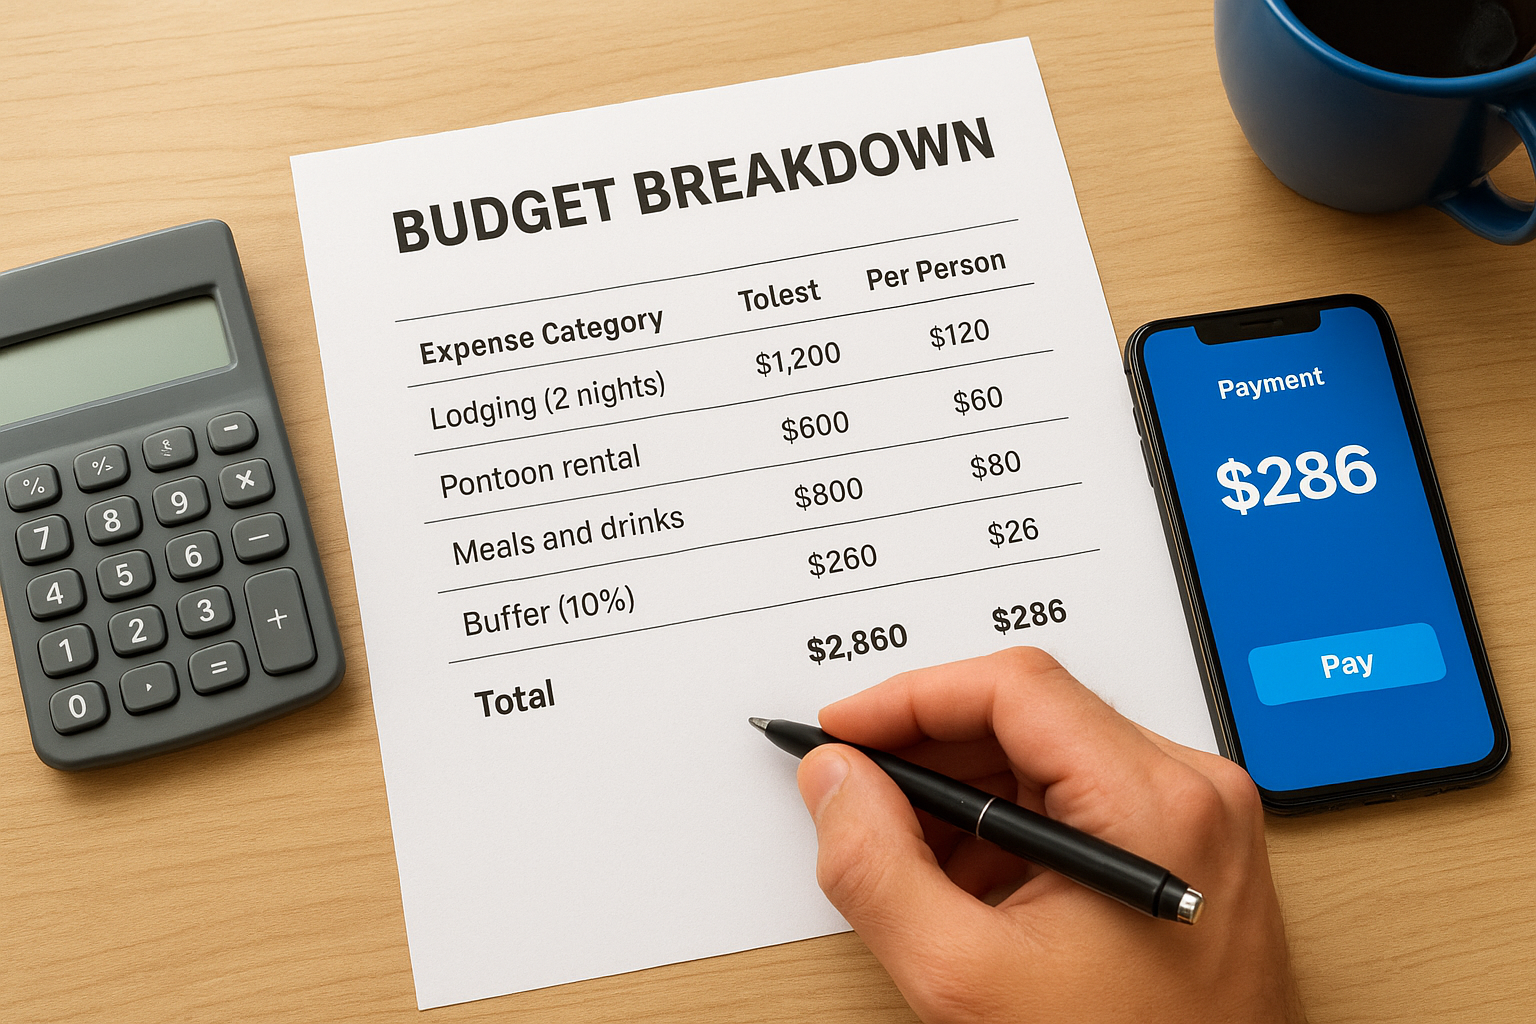
Build your budget by listing every major expense category upfront: accommodation (per night per person), transportation (flights, gas, rentals), activities (pontoon rental, fishing charter, jet skis), food and drinks (restaurants, grocery runs), and supplies (decorations, gear, party essentials). Use this simple breakdown template to share with your group:

Calculate per-person costs with a breakdown

Expense Category Total Cost Per Person
Lodging (2 nights) $1,200 $120
Pontoon rental $600 $60
Meals and drinks $800 $80
Buffer (10%) $260 $26
Total $2,860 $286

Transparency on costs prevents sticker shock and gets everyone on the same page before you start booking.

Use payment apps to collect deposits

Request a 50% deposit immediately after sharing your budget breakdown, then collect the remaining balance 2 weeks before the trip. Use Venmo, Zelle, or PayPal with a clear payment note like "Bachelor Party Deposit – [Groom Name]" so transactions stay organized. Send one group message with the payment link, dollar amount, and firm deadline, then follow up individually with anyone who hasn’t paid within 48 hours.

Step 3. Book the big logistics early

Your bachelor party checklist requires you to lock down major bookings immediately after collecting deposits. Big logistics means accommodations, primary activities, and transportation that have limited availability or price increases as dates approach. Book these items 2 to 3 months ahead for popular destinations like Destin, Florida, or 4 to 6 weeks ahead for local trips to secure group rates and avoid sold-out scenarios.

Reserve accommodations first

Contact hotels, vacation rentals, or beach houses as your first booking priority since lodging anchors your entire trip. Request group rate quotes for properties that can house everyone under one roof (houses with 4+ bedrooms or blocks of hotel rooms). Confirm cancellation policies in writing before paying deposits, especially for spring and summer dates when Destin sees peak traffic.

Lock down signature activities

Book your centerpiece activities next, whether that’s a pontoon rental at Original Crab Island, fishing charter, or jet ski package. These experiences sell out weeks in advance during busy seasons. Call vendors directly to ask about group discounts (often available for 8+ people) and confirm what’s included: fuel, captain fees, equipment, or food and drink policies.

Booking activities 6 to 8 weeks ahead gives you prime time slots and prevents settling for less desirable backup options.

Step 4. Pack and buy the essentials

Your bachelor party checklist shifts from bookings to physical preparation once you hit the 2-week mark before departure. You need two categories of items: personal gear each guest brings and shared supplies one person buys for the group. Assign responsibility for group purchases to one designated person who tracks the budget and brings receipts for reimbursement.

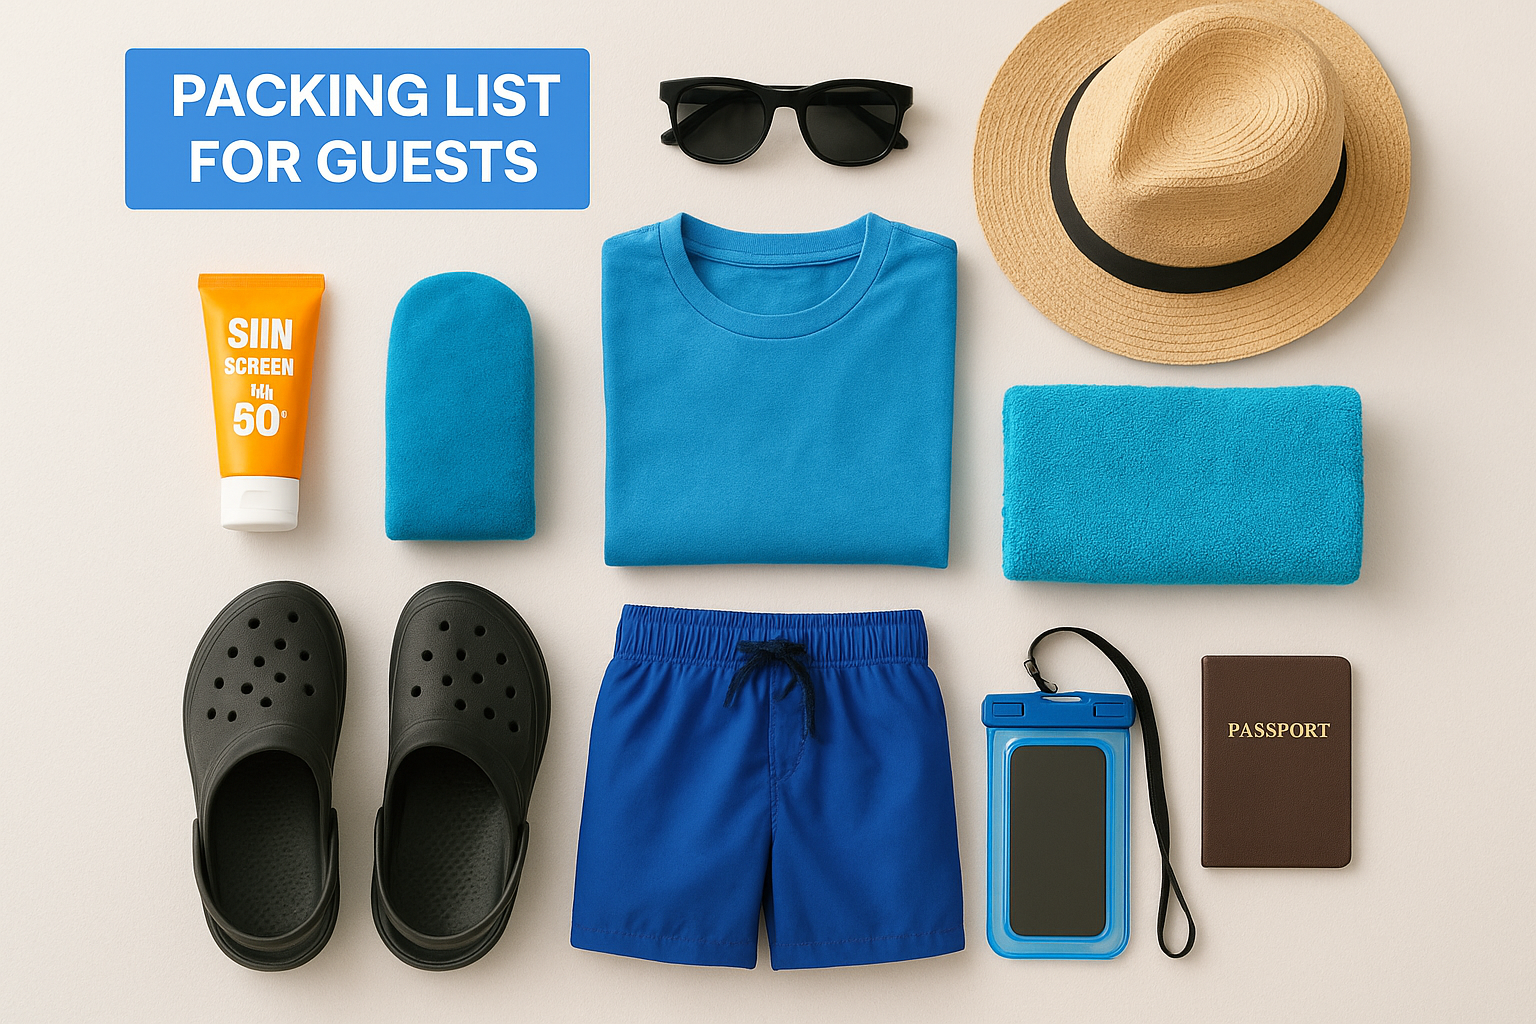
Personal packing list for guests

Send this packing checklist to all attendees 10 days before the trip so they have time to shop for missing items:

Personal packing list for guests

  • Sun protection: Sunscreen (SPF 50+), sunglasses, hat
  • Water gear: Swimsuit, water shoes, quick-dry towel
  • Clothing: Casual shirts, shorts, one nicer outfit for dinner
  • Tech: Waterproof phone case, portable charger
  • Documents: ID, credit card, insurance card

Guests forget basics like sunscreen and water shoes, which creates last-minute Walmart runs that eat into your activity time.

Group supplies to buy once

Purchase these shared items and split the cost across attendees:

  • Cooler with ice
  • Snacks and bottled water (stock for the pontoon or beach)
  • First aid kit with seasickness tablets
  • Trash bags for cleanup
  • Bachelor-themed decoration (banner, cups)

Step 5. Run the day-of plan and keep it safe

Your bachelor party checklist delivers results only when you execute it properly on game day. Assign specific roles to different group members the morning you start activities: one person handles money and tips, another manages the itinerary and time checks, and a third stays sober enough to make judgment calls if plans need adjusting. Text the full group a simple day-of schedule with locations, times, and contact numbers for all vendors (pontoon captain, restaurant reservation, hotel front desk).

Designate a safety captain and set check-in times

Choose one responsible person to stay relatively sober throughout the day and act as your safety captain. This person tracks headcounts during transitions between activities, carries the first aid kit, monitors sun exposure and hydration, and makes the final call on whether someone’s too intoxicated to continue. Set mandatory group check-ins every 2 to 3 hours where you physically count attendees and confirm everyone feels okay.

A designated safety captain prevents minor issues from becoming trip-ending emergencies, especially during water activities where judgment matters.

Keep emergency contacts saved in your phone: local urgent care address, the groom’s emergency contact, and your boat rental company’s after-hours number if you’re out on the water past closing time.
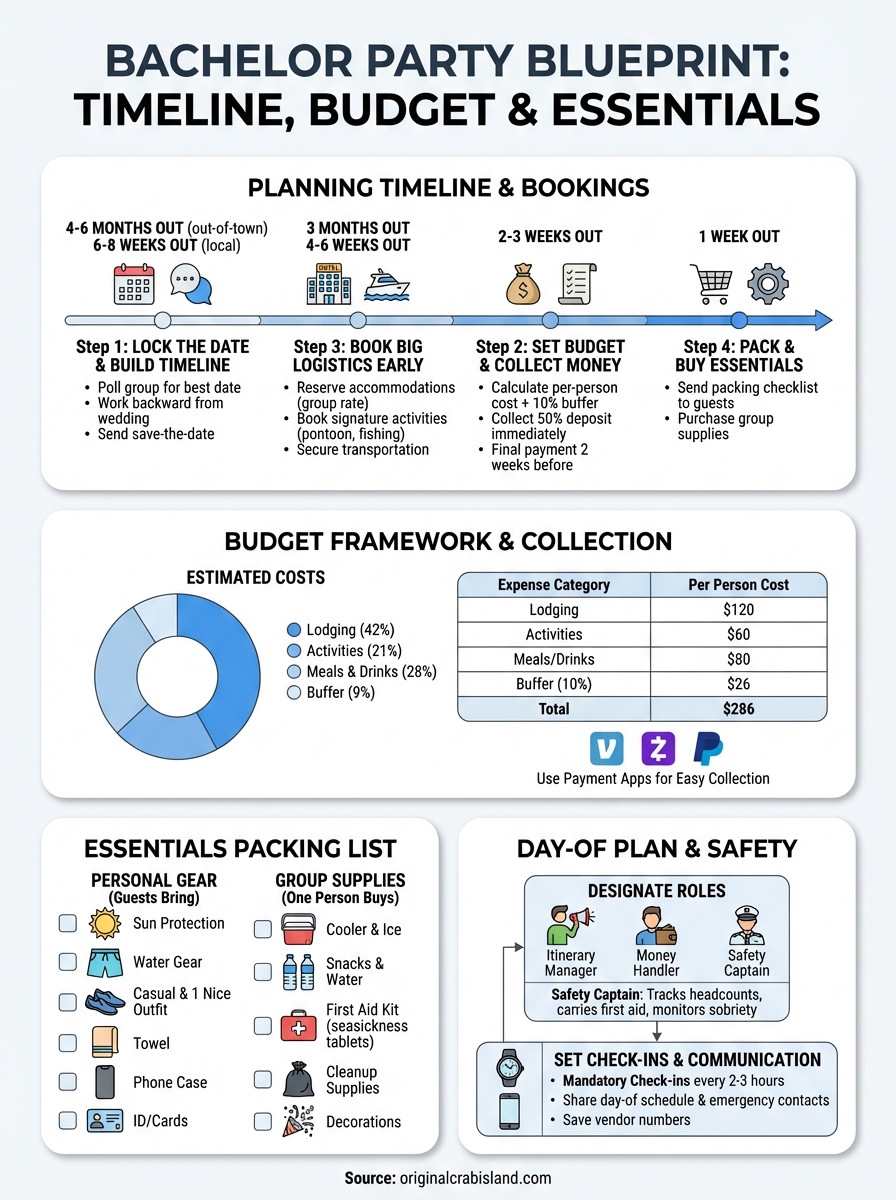
bachelor party checklist infographic

Final checks

Your bachelor party checklist works only when you review it systematically in the 72 hours before departure. Print the full checklist and walk through each category with your planning team: confirm all vendor bookings with phone calls (not just emails), verify payment balances are collected from every guest, double-check transportation logistics (who’s driving, flight times, rental car confirmations), and review your packing list against what’s actually in your bags. Send one final group text with the meeting location, exact departure time, and emergency contact numbers.

The difference between a chaotic trip and a smooth celebration comes down to preparation. Following this timeline, budget framework, and essentials list removes the guesswork from planning. When you’re ready to book the water activities that make Destin bachelor parties legendary, explore pontoon rentals, fishing charters, and jet ski packages at Original Crab Island to lock in your dates and create memories that last beyond the wedding day.

Florida Boating Laws: Age, Safety Gear, And Alcohol Rules

Planning to hit the water in Destin? Whether you’re renting a pontoon to cruise Crab Island or taking a jet ski out for some thrills, understanding Florida boating laws is essential before you cast off. These regulations exist to keep everyone safe on the water, and knowing them can save you from fines, accidents, or a ruined vacation day.

At Original Crab Island, we help thousands of visitors experience the Emerald Coast each year. We’ve seen firsthand how a little knowledge about age requirements, safety equipment, and alcohol rules can make the difference between a smooth trip and a stressful one. Florida takes boating safety seriously, with specific regulations covering everything from who can legally operate a vessel to what gear must be on board.

This guide breaks down what you need to know about Florida’s boating regulations, including boater education requirements, age restrictions, mandatory safety equipment, and the state’s strict rules about drinking while operating a boat. Whether you’re a first-time boater or a seasoned captain, understanding these laws will help you stay legal and safe on Florida waters.

What Florida boating laws cover and why they matter

Florida boating laws establish clear guidelines for operating any vessel on state waters, from small kayaks to large yachts. These regulations cover operator requirements, safety equipment, navigation rules, and alcohol restrictions. The Florida Fish and Wildlife Conservation Commission (FWC) enforces these laws across all waterways, including the Gulf of Mexico, bays, rivers, and inland lakes.

Core areas of regulation

You’ll find that Florida boating laws address four main categories that directly affect your time on the water. Education and licensing requirements determine who can legally operate different types of vessels based on age and training. Safety equipment standards specify exactly what gear you must carry on board for different boat sizes and uses. Navigation rules govern how you interact with other boats, swimmers, and wildlife, while alcohol and impairment laws set strict limits on operating under the influence.

Understanding these categories before you rent or operate a boat helps you avoid violations that can result in fines starting at $50 and going up to thousands of dollars for serious infractions.

Why compliance protects you

Following these regulations does more than keep you out of legal trouble. Proper safety equipment has saved countless lives during emergencies, engine failures, and unexpected weather changes on Florida waters. The state updates these laws regularly based on accident data and safety trends, meaning compliance reflects real-world lessons learned from past incidents. Law enforcement officers patrol popular areas like Crab Island heavily during peak season, and they check for violations during routine safety inspections. Knowing the rules before you head out means you can focus on enjoying your day instead of worrying about fines or having your trip cut short.

Boater education card rules and common exemptions

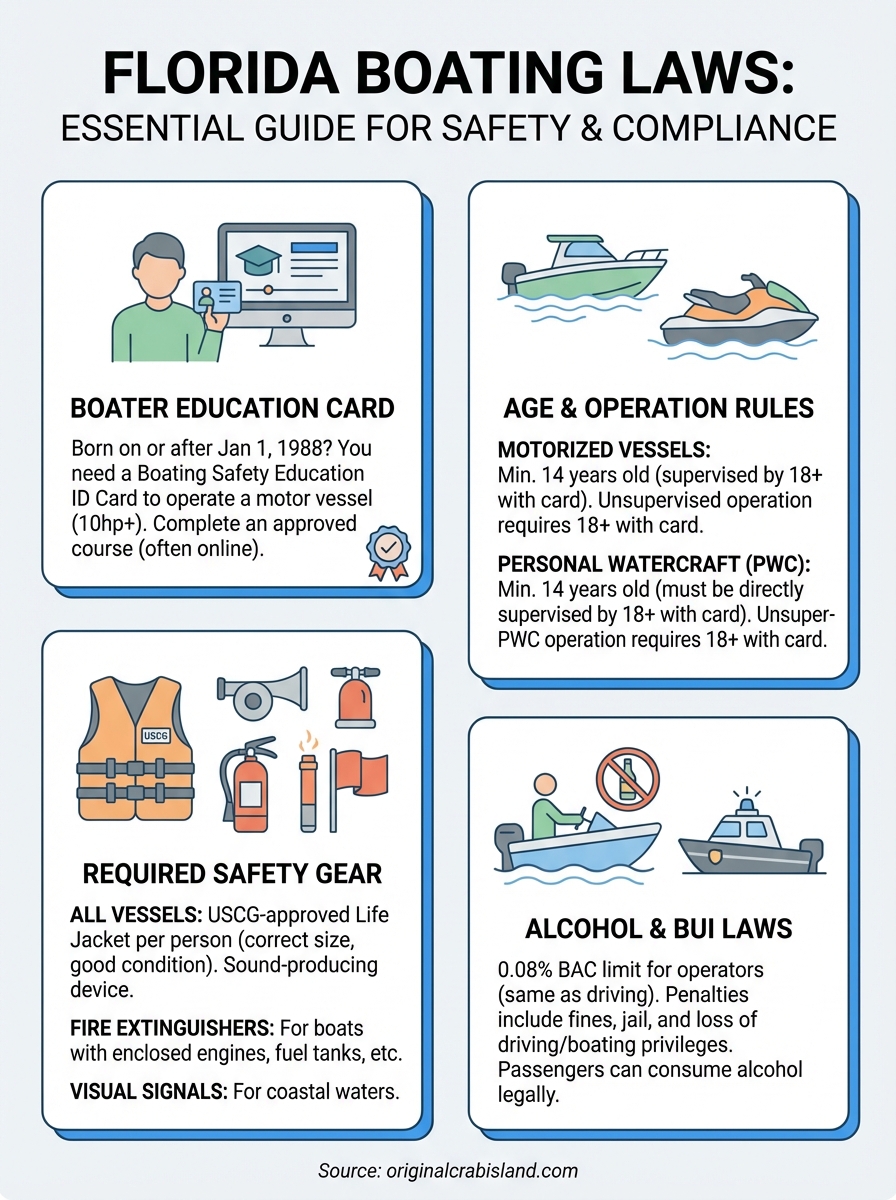
Florida requires most boaters to carry a Boating Safety Education ID Card, commonly called a boater education card, before operating any motorized vessel. You obtain this card by completing an approved boating safety course and passing the final exam. The card never expires and remains valid across all Florida waters, making it a one-time requirement that covers your entire boating career in the state.

Who needs a boater education card

Anyone born on or after January 1, 1988 must have a valid boater education card to operate a vessel with a motor of 10 horsepower or greater. This applies to all ages above the minimum operating requirements, meaning both teens and adults fall under this rule. The Florida Fish and Wildlife Conservation Commission approves several course providers, and you can complete the training online or in person. Most online courses take 2-3 hours to finish, and you receive your card within weeks of passing.

Florida boating laws make no exceptions for out-of-state residents, so even if you’re visiting from another state, you need this card if you were born after 1988.

Common exemptions that apply

You don’t need a boater education card if you’re operating on private property, such as a pond or lake entirely within privately owned land. Non-residents who have a valid boating license from their home state or country are also exempt. Additionally, anyone renting a boat from a licensed livery must only complete a safety checklist and receive basic instructions from the rental operator.

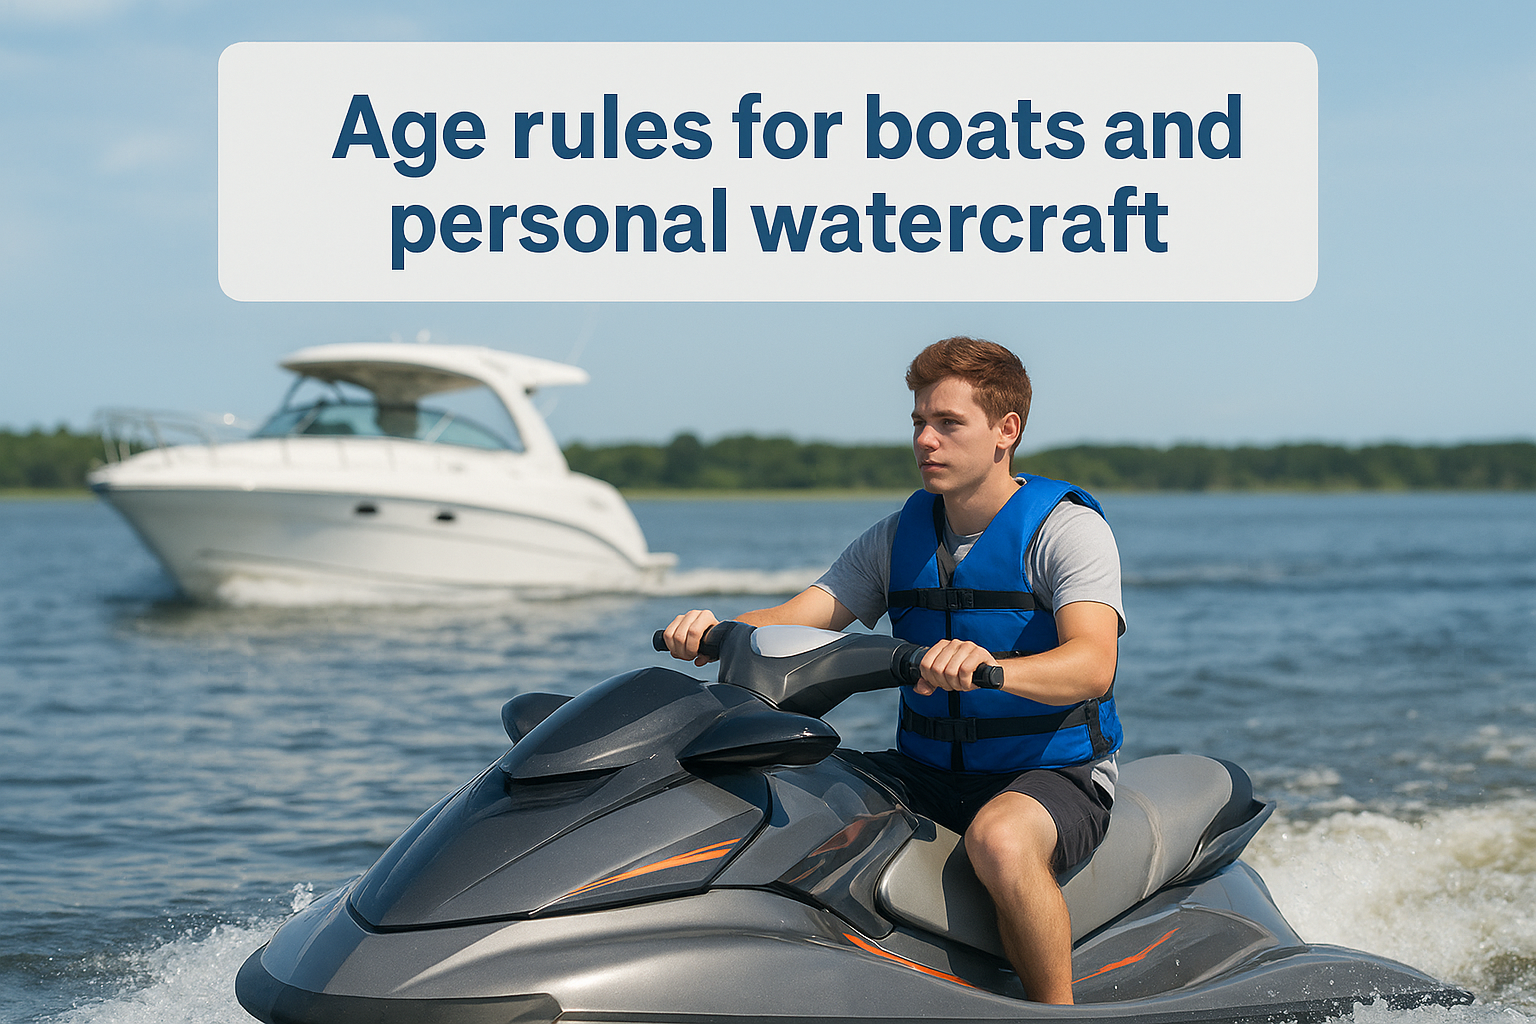
Age rules for boats and personal watercraft

Florida sets specific age requirements for operating different types of vessels, and these rules vary based on whether you’re piloting a traditional boat or a personal watercraft like a jet ski. Understanding these age restrictions is critical because violating them results in fines and potentially having your vessel impounded. The state considers personal watercraft more dangerous than standard boats, which explains why stricter age limits apply to jet skis and similar craft.

Age rules for boats and personal watercraft

Minimum age for operating vessels

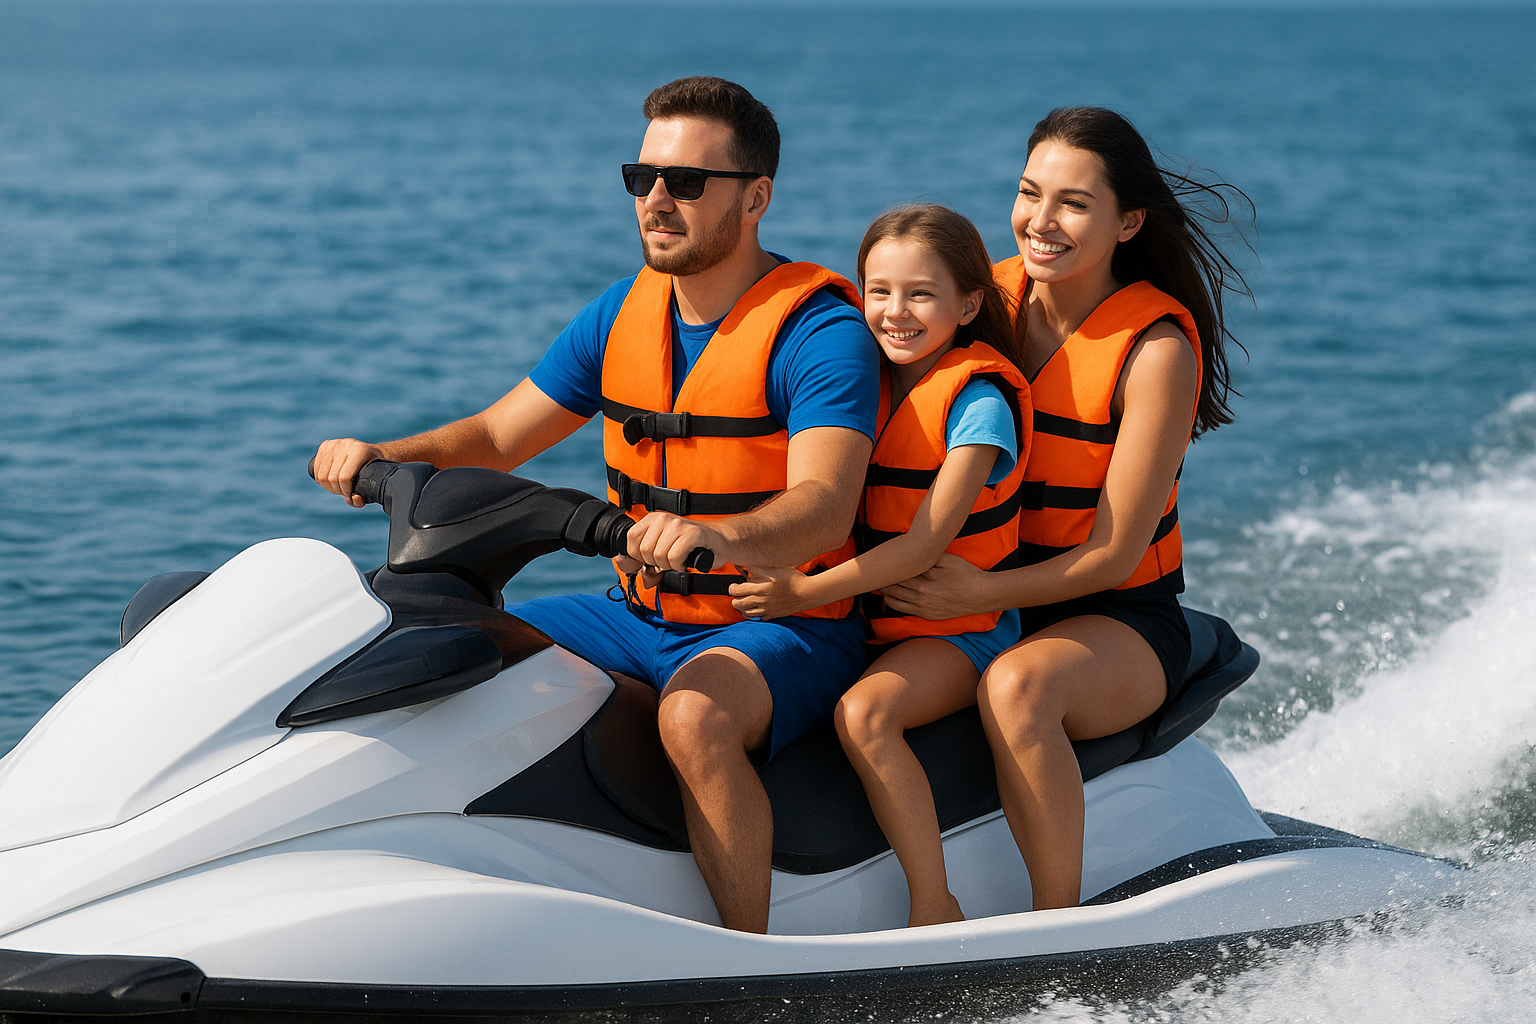
You must be at least 14 years old to operate a motorized vessel without supervision in Florida. Anyone younger than 14 can operate a boat only if someone 18 or older who holds a boater education card directly supervises them. This supervisor must be physically present on the vessel and able to take immediate control if needed.

Florida boating laws enforce these age requirements strictly, and officers can request proof of age during safety inspections on the water.

Personal watercraft age restrictions

Operating a personal watercraft requires you to be at least 14 years old, but even at that age, you need direct supervision from someone 18 or older with a boater education card. Once you turn 18, you can operate a PWC independently as long as you have the required boater education card. The state applies these stricter rules because personal watercraft demand faster reaction times and present higher accident risks than traditional boats.

Required safety gear checklist for Florida boats

Every vessel operating in Florida waters must carry specific safety equipment based on its size and type. Florida boating laws mandate these items to handle emergencies, signal for help, and prevent accidents. Officers from the Florida Fish and Wildlife Conservation Commission conduct random safety inspections, and missing equipment results in fines and potential citations that can reach several hundred dollars.

Required safety gear checklist for Florida boats

Essential equipment for all vessels

Your boat must have a U.S. Coast Guard-approved personal flotation device (life jacket) for each person on board, regardless of the vessel’s size. These PFDs need to be the correct size for each passenger and in serviceable condition without rips, tears, or missing straps. You also need a sound-producing device like a whistle or horn that’s audible for at least half a mile. Fire extinguishers become mandatory for boats with enclosed engine compartments, permanent fuel tanks, or closed living spaces. Visual distress signals are required for boats operating in coastal waters beyond the inlet, and these can include flares, orange flags, or electric distress lights.

Carrying expired flares or damaged life jackets counts as not having the required equipment at all, so inspect your safety gear before every trip.

Additional requirements by boat length

Boats over 16 feet need a throwable flotation device like a ring buoy or cushion in addition to wearable life jackets. Navigation lights become mandatory for any vessel operating between sunset and sunrise or during reduced visibility.

Alcohol rules and boating under the influence in Florida

Florida treats boating under the influence (BUI) with the same seriousness as driving under the influence on roads. Operating any vessel while impaired by alcohol or drugs violates state law and carries severe penalties that can affect your driving privileges, not just your boating rights. The Florida Fish and Wildlife Conservation Commission actively patrols popular boating areas, especially during weekends and holidays when water traffic increases.

Legal limits and BUI charges

You face BUI charges if your blood alcohol concentration reaches 0.08% or higher while operating a vessel. Officers can also arrest you for BUI even below this limit if they observe impaired normal faculties like slurred speech, poor coordination, or unsafe boat handling. First-time BUI convictions result in fines up to $1,000 and possible jail time of six months. Second offenses within five years increase penalties to $2,000 in fines and nine months imprisonment.

Florida boating laws allow officers to conduct field sobriety tests on the water, and refusing these tests results in automatic suspension of your boating and driving privileges for one year.

Enforcement and open container rules

Unlike some states, Florida allows open containers of alcohol on boats as long as the operator remains sober. Passengers can legally drink while you’re operating the vessel. However, officers regularly stop boats for safety checks and can request sobriety tests if they suspect impairment based on your boat handling or behavior.

florida boating laws infographic

Quick wrap-up before you go

Understanding florida boating laws keeps you safe and helps you avoid fines that can reach hundreds or thousands of dollars. You need a boater education card if you were born after 1988, and you must be at least 14 to operate most vessels without direct supervision. Safety equipment requirements vary by boat size, but every vessel needs life jackets for each person, sound-producing devices, and often fire extinguishers. The state enforces a 0.08% blood alcohol limit for operators, with penalties that affect both boating and driving privileges.

These regulations exist because Florida waters see thousands of boaters daily, especially around popular destinations like Crab Island in Destin. Officers patrol regularly and conduct random safety checks, so keeping your required gear on board and staying sober protects you from citations and helps ensure everyone gets home safely after a day on the water.

Ready to experience the Emerald Coast with confidence? Original Crab Island provides all the equipment and guidance you need for a safe, legal, and memorable day exploring Florida’s beautiful waters.

What Is a Yacht Charter? Types, Costs, And What’s Included

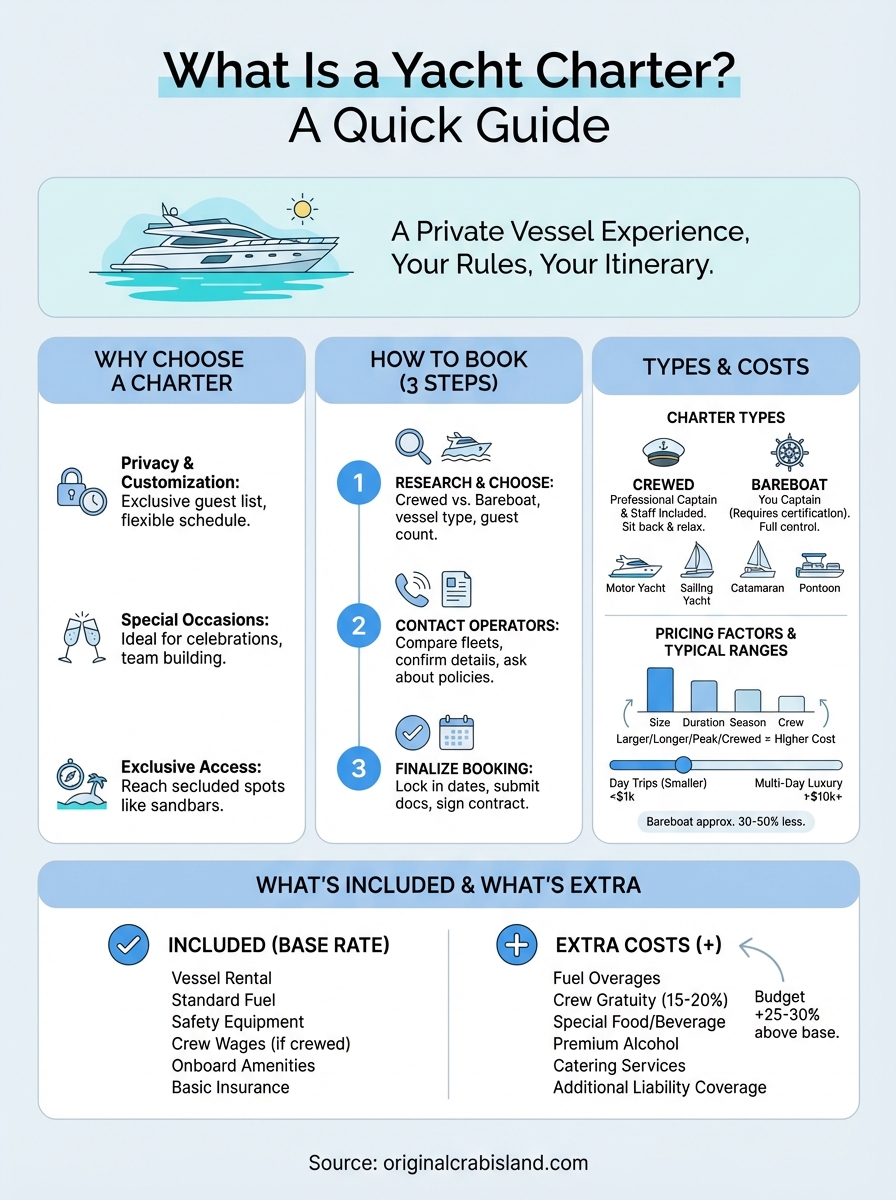
Picture yourself gliding across the turquoise waters of Florida’s Emerald Coast, the sun warming your face while you decide where to anchor next. That level of freedom is exactly what a yacht charter offers, a private vessel experience without the commitment of ownership. Whether you’re celebrating a milestone, planning a corporate retreat, or simply craving time on the water, chartering a yacht puts you in control of your itinerary and guest list.

For many first-timers, the process can seem overwhelming. Questions about costs, crew options, and booking details often hold people back from taking the plunge. The good news? Yacht charters come in various formats to match different budgets and experience levels, from fully crewed luxury vessels to bareboat rentals for certified captains.

At Original Crab Island, we help visitors explore Destin’s stunning coastline through our boat and yacht rental services. This guide breaks down everything you need to know, charter types, typical pricing structures, and what’s actually included when you book. By the end, you’ll have a clear picture of whether a yacht charter fits your next adventure on the water.

Why people choose yacht charters

The decision to rent a yacht instead of booking a traditional vacation stems from one core benefit: complete control over your experience. You’re not locked into hotel checkout times, crowded beach access, or preset tour schedules. A yacht charter transforms your group into the only priority for that stretch of time, whether you’re anchored at a secluded sandbar or cruising past coastal landmarks at your own pace.

Privacy and customization

Standard boat tours cram dozens of strangers onto a single vessel, forcing you to share space and compromise on timing. When you charter a yacht, your guest list stays exclusive to the people you invite. You choose the departure time, pick your route, and adjust plans mid-trip if the weather shifts or someone spots dolphins. This flexibility proves especially valuable for families with young children who need nap schedules or groups celebrating milestones that require private conversations and undivided attention.

A chartered yacht gives you the freedom to craft a day on the water that matches your exact vision, not a company’s predetermined itinerary.

Special occasions worth celebrating

Corporate teams book charters for team-building exercises that actually feel rewarding rather than forced. The neutral setting of open water encourages authentic conversations, while activities like snorkeling or fishing create shared memories. Bachelor and bachelorette parties benefit from built-in entertainment without the hassle of coordinating transportation between venues. Anniversary celebrations gain romance when couples anchor at sunset spots away from crowded public beaches.

Access to exclusive locations

Many of Florida’s most stunning spots sit beyond the reach of standard beach access. You can’t walk to Crab Island’s famous shallow waters or swim near secluded coves without a vessel. Chartered yachts bring you directly to prime snorkeling reefs, hidden sandbars, and wildlife viewing areas that remain inaccessible to landlocked tourists. The captain’s local knowledge helps you discover tucked-away gems that don’t appear in guidebooks, maximizing your time on the water instead of searching for the next worthwhile stop.

How to charter a yacht step by step

What Is a Yacht Charter? Types, Costs, And What’s Included

The booking process doesn’t require specialized knowledge or connections in the yachting world. Most charter companies walk you through each decision point to match your budget and group size with the right vessel. Understanding what is a yacht charter really means in practical terms starts with knowing these three straightforward phases that take you from initial research to departure day.

Research and choose your charter type

Start by deciding if you want a crewed experience or prefer to captain the vessel yourself with a bareboat charter. Crewed options handle navigation, meal preparation, and local expertise, while bareboat rentals require valid boating certifications and hands-on sailing knowledge. Your group size directly impacts which vessels work, so count exact passengers before browsing availability. Consider whether you need overnight accommodations or just day-trip capabilities, as this drastically changes your options and pricing.

Contact operators and compare options

Reach out to at least three charter companies in your destination area to compare fleet quality and service offerings. Ask specific questions about fuel policies, cancellation terms, and what happens if weather forces a schedule change. Request photos of the actual vessel you’ll receive rather than generic fleet images. Verify insurance coverage, required deposits, and whether gratuity gets included or calculated separately.

Direct communication with charter operators reveals hidden details that website descriptions often skip.

Confirm details and finalize booking

Once you’ve selected a provider, lock in your preferred dates immediately since peak season books months ahead. Submit required documentation like boating licenses or security deposits through the company’s secure payment system. Review your written contract for departure times, pickup locations, and emergency contact procedures before signing anything.

Types of yacht charters and boats

Understanding what is a yacht charter involves knowing your two fundamental rental options and the vessel categories available in each. The charter type you select determines your level of hands-on involvement, required certifications, and overall experience on the water. Most operators categorize their fleet by both operational style and boat design, making it easier to match your comfort level with the right vessel.

Crewed vs bareboat options

Crewed charters provide a professional captain and crew who handle navigation, docking, and all technical aspects of operating the vessel. You relax while experienced staff manage the boat, prepare meals if included, and recommend hidden local spots worth visiting. Bareboat charters require you to possess valid boating licenses and hands-on experience operating similar vessels. You take full responsibility for piloting, safety checks, and route planning without crew assistance.

Crewed options suit first-time charterers or groups focused on relaxation, while bareboat rentals appeal to certified captains seeking full control.

Common vessel categories

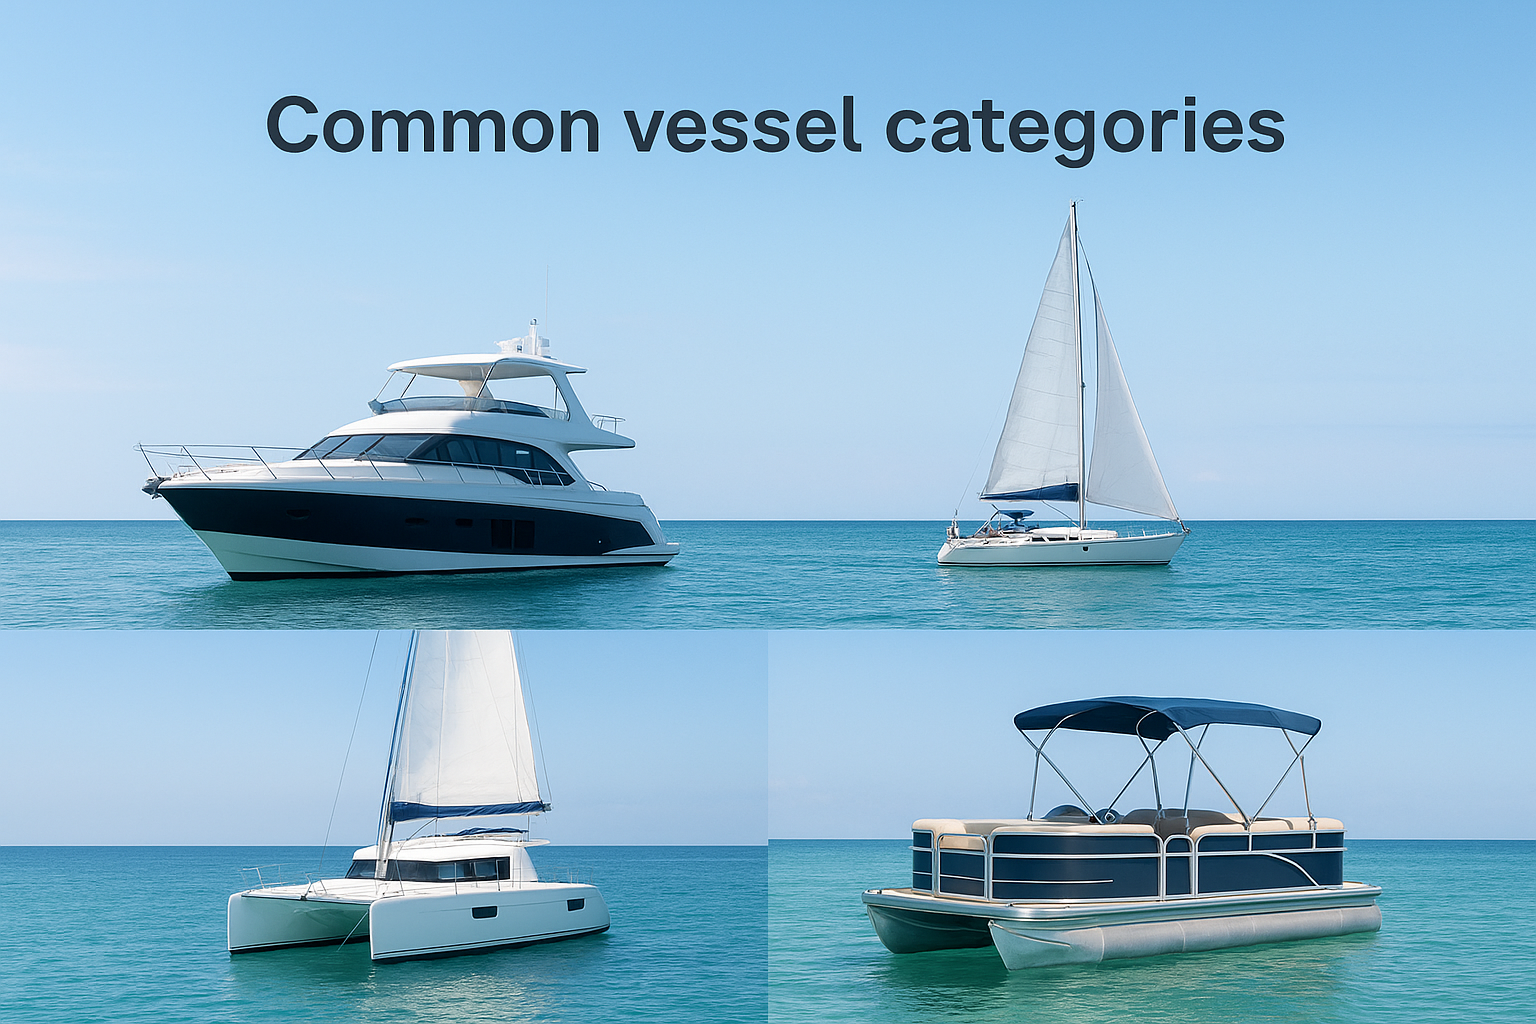
Motor yachts deliver speed and stability with spacious decks and climate-controlled interiors, making them ideal for families or corporate events. Sailing yachts offer authentic wind-powered experiences but demand more crew skill and patience with changing conditions. Catamarans feature dual hulls for extra stability and shallow drafts perfect for exploring sandbars like Crab Island. Pontoon boats provide affordable, easy-to-operate platforms suited for day trips and casual cruising in protected waters.

Common vessel categories

What a yacht charter costs and why

Your charter cost reflects several interconnected factors rather than a single fixed rate per day. Understanding what is a yacht charter pricing structure reveals why quotes vary dramatically between companies and vessel types. Most operators calculate fees based on boat size, charter duration, season timing, and whether you select crewed or bareboat options. Additional variables like fuel consumption, crew gratuities, and special requests alter your final invoice significantly.

Factors that drive pricing

The vessel’s length directly impacts your rate because larger yachts consume more fuel and require bigger crews to operate safely. Peak vacation months like summer and spring break command premium rates compared to off-season bookings when demand drops. Crewed charters cost substantially more than bareboat options since you’re paying for professional expertise and service throughout your trip. Location matters too, because popular destinations like Florida’s Emerald Coast maintain higher baseline prices than less-traveled coastal areas.

Charter rates exist on a sliding scale where convenience, luxury level, and timing combine to shape your total investment.

Typical price ranges

Day charters on smaller vessels start around $500 for basic pontoon boats in protected waters, while mid-size motor yachts reach $2,000 to $5,000 for eight-hour trips with crew. Luxury catamarans and multi-day charters push costs into five-figure territory depending on amenities and guest capacity. Bareboat rentals typically run 30 to 50 percent less than crewed equivalents for the same vessel category.

Typical price ranges

What’s included and what costs extra

Your charter contract splits costs into base rate inclusions and additional expenses that appear on your final invoice. Understanding what is a yacht charter price actually covers helps you budget accurately and avoid surprise charges after your trip. Most operators include basic operational costs in their quoted rates, while luxury upgrades and consumables generate separate line items. Reading your contract carefully before signing reveals exactly where your money goes and which services require upfront deposits or day-of payments.

Standard inclusions

The base charter fee typically covers vessel rental, standard fuel allowances, and basic safety equipment like life jackets and navigation tools. Crewed charters bundle in captain and crew wages for the duration of your booking. You get access to onboard amenities such as sound systems, fishing gear if advertised, and water toys like paddleboards that come standard with the vessel. Insurance coverage for the boat itself usually falls within the base rate, though you might need separate liability protection depending on the operator.

Common extra charges

Fuel overages appear when you exceed predetermined usage limits, especially on longer trips or high-speed runs. Crew gratuity ranges from 15 to 20 percent of your charter cost and gets calculated separately from the base rate. Special food and beverage requests, catering services, and premium alcohol selections all carry additional fees beyond what operators stock by default.

Budget an extra 25 to 30 percent above your base charter rate to cover typical add-ons and gratuities comfortably.

what is a yacht charter infographic

Next steps for your trip

You now understand what is a yacht charter and how the rental process unfolds from initial research through departure day. The knowledge you’ve gained about charter types, pricing structures, and included amenities removes the guesswork from planning your water-based adventure. Your next move involves selecting dates, determining your group size, and contacting operators in your destination area to compare vessel options and real-time availability.

Destin’s crystal-clear waters and famous sandbars create the perfect setting for your first charter experience. Original Crab Island offers both pontoon boat rentals and yacht charters designed specifically for exploring the Emerald Coast’s most sought-after destinations. Our local expertise helps you navigate Crab Island’s shallow waters and discover hidden spots that standard tours skip entirely. We maintain well-equipped vessels and provide transparent pricing without hidden fees. Book your Destin boat rental today to lock in your preferred dates before peak season fills our calendar.

What To Wear For Deep Sea Fishing: 5 Clothing Essentials

You’ve booked your deep sea fishing charter, the excitement is building, and then it hits you, what to wear for deep sea fishing? The wrong clothing choice can turn an epic day on the Gulf of Mexico into hours of discomfort from sunburn, seasickness amplified by overheating, or freezing ocean spray.

At Original Crab Island, we’ve taken countless anglers out on our Destin fishing charters. After years of guiding trips into the Gulf, we know exactly what works, and what leaves people miserable by noon. Sun protection, moisture management, and proper footwear aren’t optional extras; they’re non-negotiables for offshore fishing. This guide breaks down the five clothing essentials you need to stay comfortable, safe, and focused on landing your catch.

What To Wear For Deep Sea Fishing: 5 Clothing Essentials

1. A UPF long-sleeve fishing shirt

Your first line of defense against the Gulf sun is a quality long-sleeve fishing shirt with UPF rating. The sun reflects off the water, hits you from above, and amplifies UV exposure by up to 25% compared to land-based activities. A proper fishing shirt blocks harmful rays while keeping you cool through moisture-wicking technology that standard cotton t-shirts simply can’t match.

What to look for in a sun shirt

You want a UPF rating of 30 or higher, with 50+ being the gold standard for all-day offshore protection. Look for shirts with built-in ventilation panels along the sides or back, which allow airflow without compromising sun coverage. The collar should stand high enough to protect your neck, and thumb holes in the cuffs keep sleeves from riding up when you’re fighting a fish or reaching for gear.

Why long sleeves beat short sleeves offshore

Short sleeves leave your forearms exposed to six to eight hours of direct sun on a typical charter, and sunscreen alone won’t cut it when you’re sweating and getting splashed. Long sleeves eliminate reapplication gaps and protect against rope burn, fish spines, and accidental hook scratches. You’ll stay cooler too; the shade created by long sleeves actually reduces skin temperature compared to bare arms baking in the sun.

Anglers who skip long sleeves often deal with painful sunburns that ruin the rest of their vacation.

Fabric choices that handle sweat and spray

Synthetic blends like polyester and nylon dry in minutes, not hours, keeping you comfortable when ocean spray hits or you work up a sweat reeling in a bull dolphin. Avoid cotton entirely; it holds moisture, causes chafing, and weighs you down when wet. Some premium fishing shirts include antimicrobial treatments that prevent that sour smell after a long day handling bait and fish.

Fit tips for women, men, and kids

Choose a relaxed fit that allows full arm movement without binding when you cast or reach overhead. Women’s cuts typically offer shorter torsos and tapered waists, while men’s versions run longer with straighter side seams. For kids, size up one to account for growth and layering, and prioritize bright colors that make them easier to spot on a crowded deck. Loose is better than tight; you need room to move fast when a fish strikes.

2. A hat and polarized sunglasses

Your eyes and face take constant abuse from UV rays and reflected glare when you’re offshore, making proper headwear and eyewear essential to what to wear for deep sea fishing. The Gulf of Mexico throws intense sunlight and wind at you for hours, and standard sunglasses or baseball caps won’t hold up to the conditions. You need gear specifically designed for marine environments that stays put during rough water and protects your vision when you’re tracking fish.

2. A hat and polarized sunglasses

Hat options that stay on in wind

A wide-brimmed hat with a chin strap is your best choice for all-day sun protection that won’t blow off when the boat speeds up or wind gusts hit. Look for hats with at least a 3-inch brim that shades your face, ears, and neck from multiple angles. Avoid loose-fitting caps that lift off your head; you want an adjustable strap or drawcord that keeps the hat secure without causing headaches during long charters.

Why polarization matters on the Gulf

Polarized lenses cut through water glare by blocking horizontal light waves, letting you spot fish movement, underwater structure, and floating debris that standard tinted glasses miss. This technology reduces eye strain and fatigue by up to 60% during extended fishing sessions, keeping you alert when fish strike. Gray or copper lens tints work best in bright offshore conditions, while amber helps on overcast days.

Without polarization, you’re essentially fishing blind in the top layer of water where many species feed.

Add-ons that prevent losing gear overboard

Secure your sunglasses with a floating eyewear retainer that keeps them around your neck and prevents a $200 loss overboard. Hat clips or leashes attach to your collar or life jacket, ensuring your headwear stays connected even when knocked off. These simple accessories save hundreds of dollars in replacement costs and keep you protected throughout the trip.

Common eye and face protection mistakes

You make a critical error when you choose fashion sunglasses over fishing-specific models that lack proper UV400 protection and impact resistance. Skipping a hat entirely exposes your scalp to burns, and wearing dark glasses without polarization actually dilates your pupils and increases UV damage. Cotton bandanas under hats trap sweat instead of wicking it away, creating discomfort that distracts from fishing.

3. Quick-dry shorts or fishing pants

Your lower body needs breathable, fast-drying bottoms that handle saltwater spray, bait slime, and constant movement around a boat’s deck. The choice between shorts and pants depends on weather conditions, sun sensitivity, and trip duration, but both options should prioritize quick-dry fabrics over cotton. When deciding what to wear for deep sea fishing below the waist, flexibility and moisture management trump style every time.
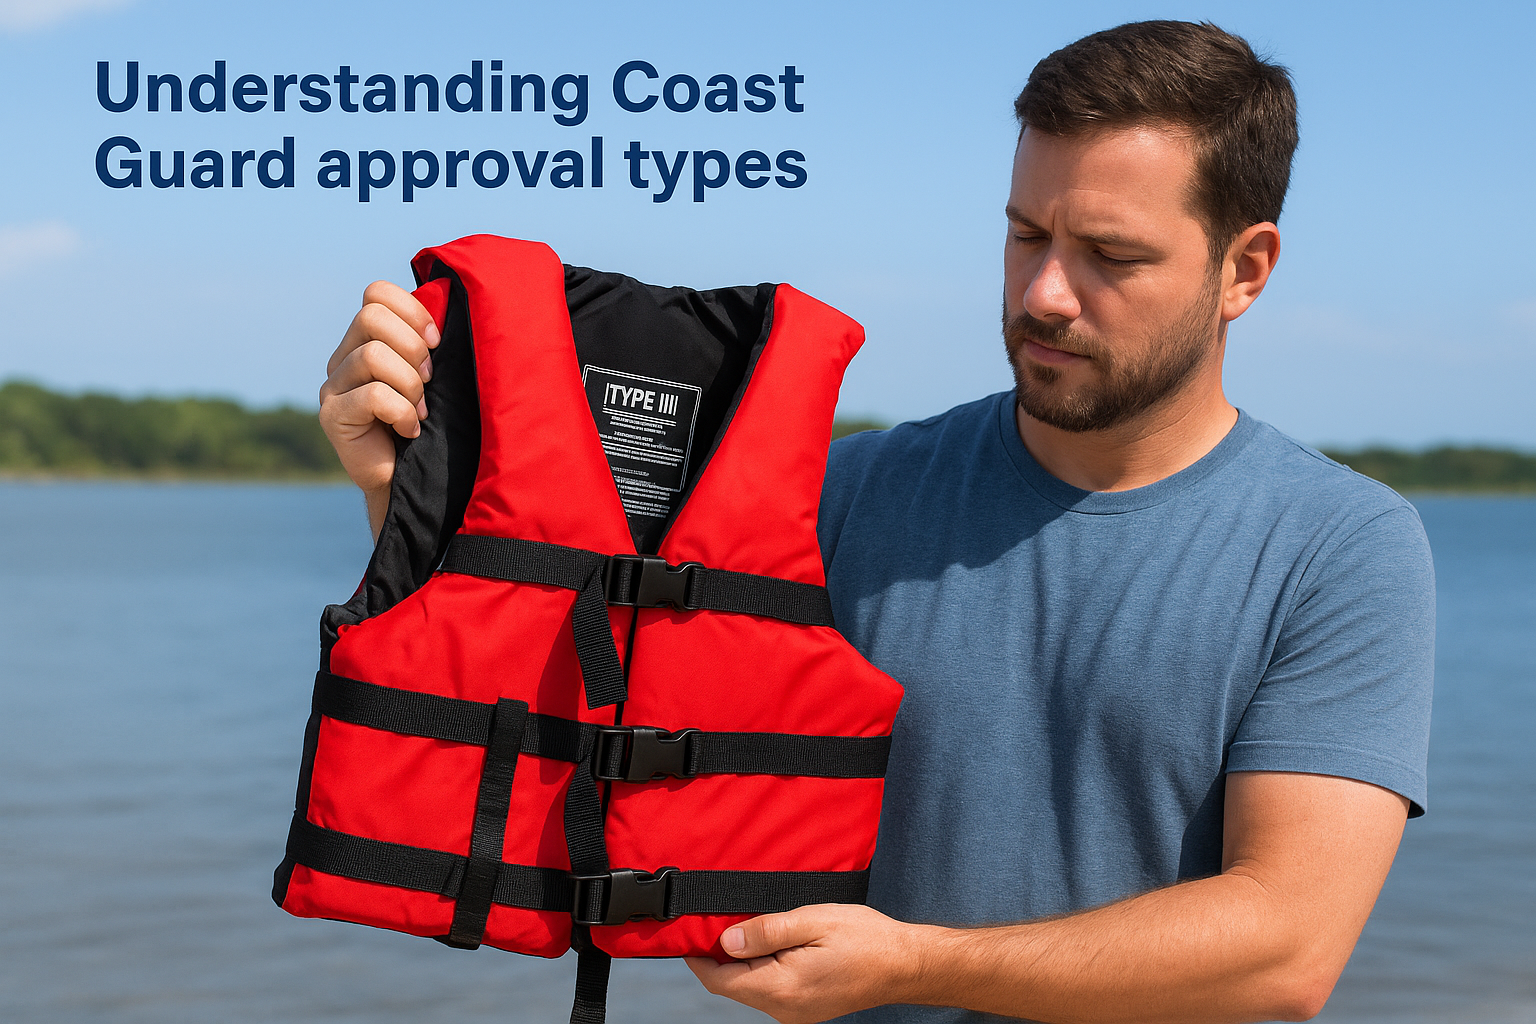
When to wear shorts vs pants on a charter

Choose fishing pants in spring and fall when morning temperatures hover in the 60s, or anytime you burn easily and want full leg coverage. Shorts work best in summer months when air temps exceed 80°F and you’ll appreciate maximum ventilation during midday heat. Convertible fishing pants with zip-off legs give you both options in a single garment, adapting to changing conditions throughout your charter.
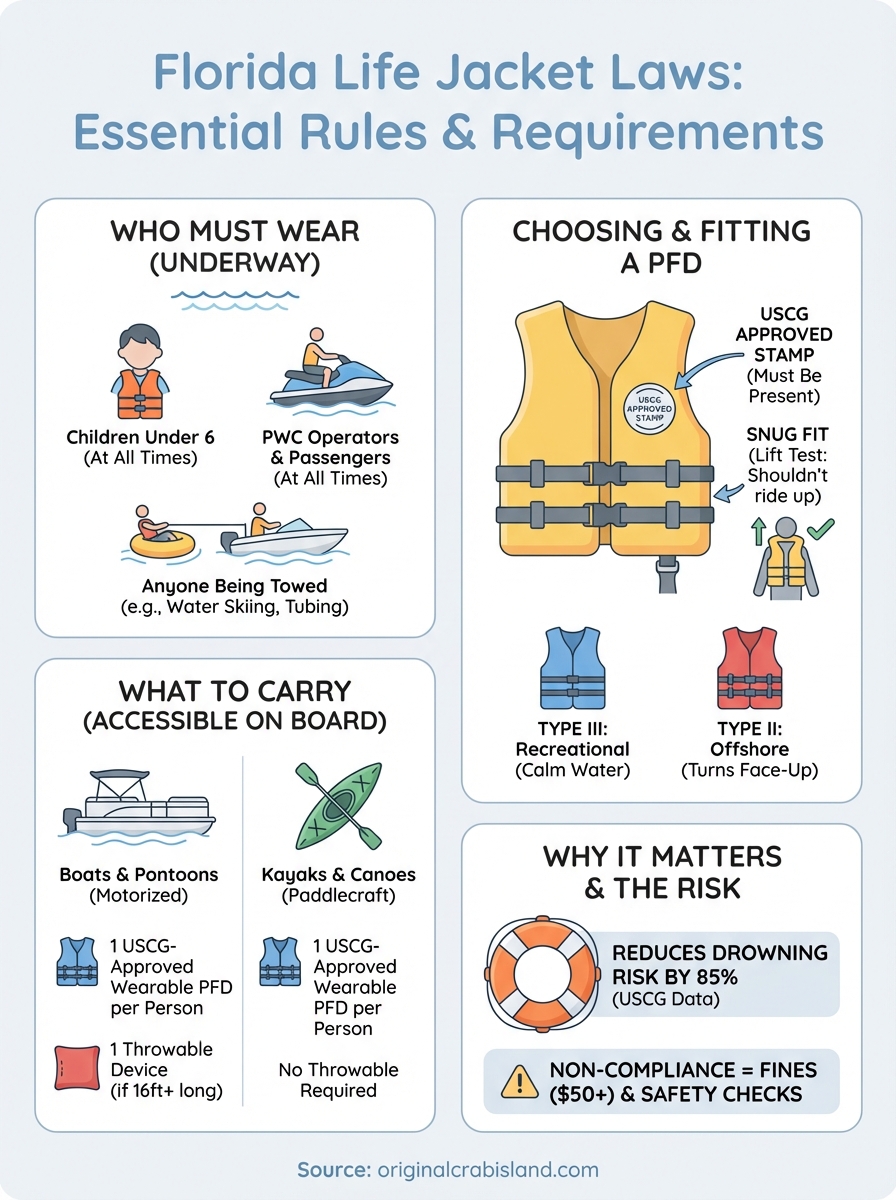
Materials that dry fast and don’t chafe

Synthetic blends of nylon and polyester with 4-way stretch dry in under 20 minutes after getting soaked, preventing that cold, clammy feeling cotton creates. Look for flatlock seams instead of raised stitching, which reduces friction points during repetitive casting motions and kneeling on the deck.

Cotton fishing bottoms stay wet for hours and cause painful chafing in warm, humid conditions.

Pockets, stretch, and movement on a boat

You need deep, secure pockets with zipper or snap closures that won’t dump your phone or wallet overboard when you bend down. Fabric with at least 10% spandex or elastane allows you to squat, lunge, and pivot without restriction when fighting fish or moving around tight spaces.

What to avoid on hooks, bait, and rails

Skip loose cargo pockets with exposed flaps that snag on rod holders and boat hardware. Avoid belt loops that catch fishing line, and never wear jeans, which absorb water, restrict movement, and take forever to dry.

4. Non-slip closed-toe deck shoes

Your footwear choice determines whether you stay upright and safe on a saltwater-soaked deck or risk serious injury from slips and falls. Wet fiberglass and metal surfaces become treacherous when combined with fish slime, bait juice, and constant ocean spray, making proper deck shoes a critical part of what to wear for deep sea fishing. Closed-toe protection shields your feet from dropped hooks, sharp fins, and heavy tackle that can cause puncture wounds or crushed toes.

4. Non-slip closed-toe deck shoes

What makes a shoe safe on a wet deck

You need non-marking rubber soles with deep siping patterns that channel water away and maintain grip on slick surfaces. The outsole should feature razor-cut grooves in multiple directions, creating hundreds of biting edges that prevent hydroplaning. Avoid smooth or worn treads that offer zero traction when conditions get wet.

Boat shoes vs deck boots vs water shoes

Classic boat shoes with leather uppers and white rubber soles work well in dry, moderate conditions but take forever to dry once soaked. Deck boots provide ankle support and full waterproofing for rough weather or winter fishing. Water shoes offer quick-dry convenience and lightweight comfort but sacrifice durability and toe protection compared to purpose-built fishing footwear.

The wrong shoes cause more fishing accidents than any other single gear mistake.

Socks and blister prevention that actually works

Wear moisture-wicking synthetic or wool blend socks that prevent friction and hot spots during long charters. Apply anti-chafe balm to your heels and toe joints before putting on socks to eliminate blister formation. Cotton socks trap moisture and guarantee painful blisters by hour three of your trip.

Footwear to skip even if it feels convenient

Never wear flip-flops, sandals, or Crocs that offer zero protection and slip off easily when you move fast. Skip running shoes with mesh panels that stay wet all day and provide inadequate grip on marine surfaces.

5. Light layers and rain protection

Gulf conditions shift dramatically between dawn departure and midday sun, making versatile layering essential to what to wear for deep sea fishing. Temperature swings of 15 to 20 degrees happen regularly on offshore charters, and unexpected rain squalls blow through even on forecast sunny days. Smart layering keeps you comfortable through every condition without overheating or getting soaked.

How temperatures change offshore near Destin

Morning departures in spring and fall start in the 50s and climb into the 70s by noon, while summer trips begin warm but cool down once the boat hits cruising speed. Wind chill on the water drops perceived temperature by 10 to 15 degrees, making that calm marina feel deceiving compared to offshore conditions. Winter charters require serious planning, with early morning temps dipping into the 40s before afternoon warming.

The simple layering system that works year-round

Start with your UPF long-sleeve fishing shirt as your base layer, add a lightweight quarter-zip pullover for morning chill, and top with a windbreaker shell for protection. This three-layer system lets you strip down as temperatures rise without sacrificing sun protection or getting stuck in bulky clothing.

Proper layering prevents the miserable choice between overheating in too many clothes or freezing in too few.

Rain gear that packs small and keeps you fishing

Pack a lightweight waterproof jacket that stuffs into its own pocket, taking up minimal space in your bag until weather turns. Look for sealed seams and adjustable cuffs that keep water from running down your arms when you’re working with tackle.

Cold-weather add-ons for early mornings and winter trips

Thin synthetic gloves with exposed fingertips maintain dexterity while protecting hands from wind and cold spray. A neck gaiter or buff provides adjustable face and neck coverage that you can pull up or down as conditions change throughout your charter.

what to wear for deep sea fishing infographic

Ready for the dock

You now know exactly what to wear for deep sea fishing on your Destin charter. Your UPF long-sleeve shirt, polarized sunglasses, quick-dry bottoms, non-slip deck shoes, and complete layering system form an outfit that protects you from sun, spray, and temperature swings catching unprepared anglers off guard throughout the day. Proper clothing separates memorable fishing trips from miserable ones, letting you focus on landing your catch instead of dealing with painful sunburn, foot blisters, chafing, or soaking wet cotton that refuses to dry even hours into your trip.

Pack these essentials the night before your charter, double-checking each item against this guide to avoid last-minute marina scrambling when you should be heading to the dock. Weather conditions on the Gulf change fast and without warning, so having the right gear ready means you stay comfortable and fishing no matter what conditions the day brings to your boat.

Ready to test your new fishing wardrobe on the water? Book your Destin fishing charter with Original Crab Island and experience the Gulf of Mexico with our expert captains who know exactly where the fish are biting.

Florida Life Jacket Laws: Age Rules, Boats, Kayaks & PWCs

Whether you’re renting a pontoon boat to cruise Crab Island or taking jet skis out on the Emerald Coast, understanding Florida life jacket laws is essential before you hit the water. These regulations aren’t just bureaucratic requirements, they’re designed to keep you, your family, and your crew safe during every outing.

Florida law sets specific rules based on vessel type, passenger age, and the activities you’re doing. Get it wrong, and you’re looking at fines or citations from the Florida Fish and Wildlife Conservation Commission. Get it right, and you can focus on what matters: enjoying the water without worry.

This guide breaks down everything you need to know, from age requirements for children to the differences between boats, kayaks, and personal watercraft. We’ll cover what equipment you must have on board, who needs to wear a life jacket at all times, and how to stay compliant while making the most of your time on Florida’s waters.

Why Florida life jacket laws matter

Florida’s waterways attract over 1 million registered vessels and countless visitors each year, making it one of the nation’s busiest recreational boating destinations. With that activity comes risk: drowning remains the leading cause of death in recreational boating accidents across the state. Florida life jacket laws exist to reduce these preventable fatalities, and they apply to every vessel on the water, from kayaks to luxury yachts.

Understanding these regulations protects you from more than just legal trouble. Personal flotation devices (PFDs) give you a fighting chance in unexpected situations, whether you’re caught in a sudden storm, dealing with engine failure, or responding to a medical emergency on board. When accidents happen on the water, they happen fast, and you won’t have time to search for equipment or read instructions.

Wearing a properly fitted life jacket reduces your drowning risk by 85%, according to U.S. Coast Guard data.

The real cost of non-compliance

Citations for violating Florida’s PFD requirements start at $50 but can climb much higher depending on the circumstances. If law enforcement finds you operating a vessel without the required number of life jackets, or if a child under six isn’t wearing one, you’ll receive a non-criminal infraction with mandatory fines. These violations go on your boating record and can complicate future vessel registrations or insurance applications.

Beyond the immediate financial penalty, non-compliance puts your entire group at risk during inspections. Florida Fish and Wildlife Conservation Commission officers conduct random safety checks throughout the year, especially during peak boating season. They can require you to return to shore immediately if you’re not carrying the proper equipment, cutting your day short and creating an embarrassing situation for everyone on board.

Beyond the law: safety statistics that matter

Florida consistently ranks in the top three states for boating accidents nationwide, with drowning accounting for the majority of fatalities. In incidents where victims drowned, over 80% were not wearing life jackets at the time of the accident. These aren’t abstract statistics; they represent real families whose outings ended in tragedy because basic safety equipment wasn’t being used.

The numbers reveal something else: children under 13 face the highest risk in boating accidents. Their smaller size and lower swimming stamina make them particularly vulnerable when they enter the water unexpectedly. Florida’s age-specific requirements for life jacket use directly address this vulnerability, requiring younger children to wear PFDs at all times while the vessel is underway.

Most drowning victims are found within a short distance of safety, often just feet from their boat or the shoreline. A life jacket keeps you buoyant and conserves energy, giving you time for rescue even if you’re injured, disoriented, or exhausted. That difference between sinking and floating is the difference between a scary story and a fatal one.

Who must wear a life jacket in Florida

Florida Life Jacket Laws: Age Rules, Boats, Kayaks & PWCs

Florida life jacket laws require specific groups to wear PFDs based on age and activity, while others must simply have them accessible on board. The most important distinction involves children under six years old, who face the strictest requirements. Understanding these rules prevents citations and keeps your passengers safe during every trip.

Children under six years old

Any child under six must wear a U.S. Coast Guard-approved life jacket at all times when your vessel is underway. This requirement applies regardless of the boat’s size, type, or where you’re operating. Whether you’re cruising close to shore at Crab Island or heading into open water, the law makes no exceptions for calm conditions or short distances.

The rule covers every vessel type, from kayaks and canoes to pontoon boats and yachts. Your child must keep the life jacket on from the moment you leave the dock until you return, unless they’re below deck in an enclosed cabin. Standing on the bow, sitting in a seat, or playing in a shallow area doesn’t exempt them from wearing their PFD.

Florida defines "underway" as any time your vessel is not anchored, moored, or aground, meaning your child needs that life jacket on even when you’re drifting.

Requirements for specific activities

Personal watercraft operators and passengers of all ages must wear life jackets while the vessel is in operation. This applies to jet skis, wave runners, and similar craft, with no exceptions. You cannot remove your PFD to cool off or take photos while operating or riding as a passenger.

Requirements for specific activities

Anyone being towed behind a vessel for water skiing, tubing, wakeboarding, or similar activities must wear a life jacket. The only exception applies to performers in professional water ski exhibitions, and that exemption requires specific permits and conditions you won’t encounter during recreational outings.

Adults on traditional boats face different rules. You must have one wearable, Coast Guard-approved PFD for each person on board, but adults aren’t required to wear them unless conditions or activities demand it. However, having them readily accessible means within arm’s reach, not stored in a locked compartment or buried under gear.

What you must carry on board to stay legal

Florida life jacket laws require you to carry specific personal flotation devices based on your vessel’s size and passenger count. These aren’t optional recommendations; they’re mandatory equipment that officers check during safety inspections. Your vessel must have the correct number and type of Coast Guard-approved PFDs on board before you leave the dock, and they must remain accessible throughout your trip.

The requirements vary depending on your boat’s length and the number of people aboard. Vessels under 16 feet need one wearable, Coast Guard-approved PFD for each person, plus one throwable device if you’re carrying more than a certain capacity. Larger vessels face additional requirements, but the basic principle stays consistent: every person gets a properly sized life jacket.

Wearable PFDs for everyone

You must have one Type I, II, III, or V wearable PFD for each person on your vessel, and each device must fit the intended wearer properly. A child-sized life jacket doesn’t count toward an adult’s requirement, and an adult-sized PFD doesn’t satisfy the requirement for a small child. Officers will check sizes during inspections, so guessing or improvising creates problems.

Coast Guard approval matters. Your PFDs must display a Coast Guard approval stamp or label showing they meet federal standards. Decorative life rings, pool toys, and water wings don’t count as legal devices, even if they look similar to approved equipment. Only devices specifically manufactured and labeled for boating safety meet Florida’s requirements.

Expired or damaged life jackets fail inspections even if they’re Coast Guard-approved, so inspect your equipment before each season.

Throwable devices for larger vessels

Vessels 16 feet or longer must carry one throwable Type IV device in addition to the wearable PFDs for each passenger. This typically means a throwable cushion or ring buoy that you can toss to someone in the water. The device must be immediately accessible, not stored in a compartment or tied down where you can’t reach it quickly during an emergency.

Your throwable device cannot substitute for a wearable PFD in meeting the one-per-person requirement. Canoes and kayaks under 16 feet are exempt from the throwable device rule, but they still need wearable PFDs for everyone aboard.

Rules by activity: boats, kayaks, PWCs, towing

Florida life jacket laws change based on what you’re doing on the water, and understanding these activity-specific requirements prevents confusion during your outings. The regulations recognize that different vessels and activities carry different risks, so they adjust PFD rules accordingly. What applies to your pontoon boat rental doesn’t necessarily match the requirements for jet skiing or kayaking.

Recreational boats and pontoons

Motorized boats and pontoons follow the standard carriage requirements: one Coast Guard-approved wearable PFD for each person on board, properly sized and readily accessible. You don’t need to wear these devices as an adult unless you’re engaging in specific activities, but they must be within reach at all times while underway.

Children under six must wear their life jackets continuously on these vessels, regardless of where they’re sitting or what they’re doing. This applies whether you’re anchored at Crab Island for the afternoon or cruising through the bay at speed. The only exception allows them to remove their PFD when they’re below deck in an enclosed cabin with proper ventilation.

Kayaks and canoes

Kayakers and canoeists must carry one wearable PFD per person, even though these vessels don’t require throwable devices. The law treats paddlecraft the same as motorized vessels regarding the one-per-person rule, and those devices must meet Coast Guard approval standards.

Wearing your life jacket while kayaking isn’t legally required for adults, but conditions can change rapidly on Florida waters. Your stable kayak in calm conditions becomes unstable equipment in sudden wind or waves, and you won’t have time to put on your PFD after you capsize.

Kayakers account for a significant portion of Florida’s boating fatalities each year, with most victims not wearing their available life jackets when they entered the water.

Personal watercraft and towed activities

Everyone on a personal watercraft must wear a Coast Guard-approved life jacket at all times, with no exceptions for adults or brief stops. This requirement applies the moment you start the engine and continues until you shut it down completely. Anyone being towed behind any vessel for water sports must also wear a proper PFD throughout the activity, from the moment the rope tightens until they return to the boat.

How to choose a legal life jacket and wear it right

Selecting the correct life jacket goes beyond grabbing the first device you see at the rental counter. Florida life jacket laws require Coast Guard-approved PFDs, but approval alone doesn’t guarantee the device will work properly for you or your passengers. You need to match the life jacket type to your activity, ensure it fits the wearer correctly, and understand how to adjust it for maximum effectiveness in the water.

Understanding Coast Guard approval types

Type III life jackets work best for most recreational boating activities in Florida, offering comfort and mobility while keeping you afloat in calm to moderate waters. These devices come in various styles, from traditional vests to inflatable options, and you’ll find them at most rental facilities. Type II life jackets provide more buoyancy and will turn some unconscious wearers face-up, making them better choices for offshore trips or situations where rescue might take longer.

Understanding Coast Guard approval types

You’ll see the Coast Guard approval stamp on the inside label of every legal device. This stamp confirms the PFD meets federal performance standards for buoyancy, materials, and construction. Devices without this stamp don’t count toward your legal requirements, even if they look identical to approved models. Check for damage, fading, or missing labels before each outing, as these issues can void the approval status.

Proper fit and adjustment

Your life jacket should fit snugly without restricting your breathing or movement. After fastening all straps and zippers, have someone lift the jacket by the shoulders. If the device rides up over your chin or ears, it’s too loose and won’t keep your head above water properly. Tighten the side straps first, then adjust the waist and chest straps to eliminate excess movement while maintaining comfort.

Children’s life jackets require extra attention to fit. The device must match your child’s weight range, not their age, and those weight ranges appear clearly on every approved PFD. A jacket that’s too large will slip off during submersion, while an undersized device won’t provide adequate flotation.

A properly fitted life jacket stays in place when you’re in the water and keeps your head and airways clear of the surface without requiring you to tread water.

florida life jacket laws infographic

Key takeaways before you head out

Florida life jacket laws protect everyone on the water, from children under six who must wear PFDs at all times to adults who need devices readily accessible on board. You’ve learned that different activities carry different requirements, whether you’re operating a personal watercraft, towing water skiers, or cruising on a pontoon boat. The rules aren’t complicated once you understand them: carry the right number of Coast Guard-approved devices, ensure proper fit for each passenger, and keep everything within reach.

Compliance starts before you leave the dock. Check your equipment, verify sizes match your passengers, and confirm every device displays current Coast Guard approval. These simple steps prevent citations and keep your group safe during unexpected situations on the water.

Ready to experience Crab Island with confidence? Original Crab Island provides properly equipped rentals and ensures you have everything needed to stay legal and safe on the Emerald Coast waters.

Gulfarium Marine Adventure Park Destin: Complete Guide

Destin offers more than just pristine beaches and crystal-clear waters. The Gulfarium Marine Adventure Park Destin has been a beloved Emerald Coast attraction since 1955, giving visitors the chance to get up close with dolphins, sea lions, and other marine life. Whether you’re traveling with kids or simply love ocean creatures, this park delivers hands-on experiences you won’t find anywhere else in the area.

Planning a day at Gulfarium fits perfectly into a Destin vacation filled with water adventures. Many of our guests at Original Crab Island combine their pontoon boat trips to Crab Island with a morning or afternoon at the marine park, it’s an ideal way to experience both the wild and the curated sides of Gulf Coast marine life.

This guide covers everything you need to know before visiting: animal encounters, show times, ticket pricing, and honest tips to make the most of your trip.

What to expect at Gulfarium

Gulfarium Marine Adventure Park Destin: Complete Guide

The Gulfarium Marine Adventure Park Destin sits on a compact 5-acre property, making it easy to explore everything in three to four hours. You’ll find indoor and outdoor exhibits featuring dolphins, sea lions, seals, sea turtles, stingrays, and tropical fish. The park focuses on education and conservation, with staff members sharing information about each animal’s story and rehabilitation efforts throughout your visit.

Marine animals and exhibits you’ll see

Your visit includes access to over a dozen animal habitats spread across the park. Dolphins perform in the main stadium pool, while California sea lions demonstrate their intelligence in a separate show area. You can watch harbor seals play in their habitat, observe rescued sea turtles recovering in rehabilitation tanks, and explore the Living Sea exhibit filled with reef fish native to the Gulf of Mexico. The touch pools let you interact with stingrays and horseshoe crabs under staff supervision.

Marine animals and exhibits you'll see

Most guests spend the majority of their time at the dolphin and sea lion shows, which run multiple times daily.

Park layout and facilities

Gulfarium’s small footprint means you won’t spend your day hiking between exhibits. All animal habitats connect through shaded walkways, and benches line most viewing areas. The park includes a gift shop, snack bar, and multiple restrooms near the main entrance. Stroller access works throughout the facility, though some viewing areas get crowded during peak season. You’ll find indoor air-conditioned spaces at the main aquarium building, which provides relief during hot summer afternoons.

Tickets, hours, and what it costs

General admission to Gulfarium Marine Adventure Park Destin starts at $32.98 for adults and $24.98 for children ages 3-12. You can purchase tickets online or at the gate, though buying ahead online typically saves you $3-5 per ticket and guarantees entry during busy periods. The park offers military discounts and annual passes for Florida residents who plan multiple visits throughout the year.

Current ticket prices and package options

Standard admission includes access to all exhibits, shows, and touch pools without additional fees. Animal encounter experiences cost extra, ranging from $25 for stingray feeding to $200+ for dolphin swims. You’ll pay separately for photos taken during animal interactions, with packages starting at $40 for digital downloads. Group rates apply for parties of 15 or more, bringing the per-person cost down by approximately 15%.

Booking tickets online at least 24 hours in advance locks in lower prices and helps you skip the ticket booth line.

Operating hours and best times to visit

The park opens daily at 9:00 AM and closes at 4:30 PM, with extended summer hours until 6:00 PM from Memorial Day through Labor Day. Arriving right at opening gives you the smallest crowds and cooler temperatures for outdoor exhibits. Weekday visits in spring and fall offer the best experience, while summer weekends see the longest wait times for popular animal encounters.

Shows and animal encounters

Four main shows run throughout the day at Gulfarium Marine Adventure Park Destin, each lasting 15-20 minutes. You’ll watch dolphins demonstrate their athletic abilities, sea lions show off problem-solving skills, and trainers explain conservation efforts between performances. Shows repeat multiple times daily, giving you flexibility to catch everything without rushing between exhibits.

Daily show schedule and timing

Dolphin shows typically run at 10:00 AM, 12:00 PM, 2:00 PM, and 4:00 PM, while sea lion presentations fill the gaps at 11:00 AM and 3:00 PM. Seating in both stadiums works on a first-come basis, and front rows get splashed during warm months. You’ll want to arrive 10-15 minutes early for popular time slots, especially the midday dolphin show when crowds peak.

Daily show schedule and timing

Schedule changes happen during off-season months, so check the current lineup when you arrive at the park.

Hands-on animal experiences

Stingray feeding costs $25 and lets you hand-feed the rays in their touch pool under staff guidance. The dolphin encounter program runs $150-200 depending on the experience level you choose, from shallow-water interactions to deeper swim sessions. You must book animal encounters at least 48 hours in advance through the park’s website, as spots fill quickly during peak vacation weeks.

How to plan your visit and save time

Morning visits between 9:00 AM and 11:00 AM offer the best experience at Gulfarium Marine Adventure Park Destin, giving you cooler temperatures and smaller crowds for photo opportunities. You’ll want to check the daily show schedule posted near the entrance immediately after arriving, then plan your route around exhibits between performances. Most visitors spend three to four hours completing everything, though animal encounter bookings may extend your stay.

Best arrival strategy

Parking fills quickly after 11:00 AM during summer months, so arriving early secures spots closest to the entrance. You can grab breakfast at nearby restaurants on Highway 98, then walk into the park right when gates open. Download show times from the park’s website the night before your visit to build a rough itinerary. This planning prevents you from missing featured presentations or rushing between exhibits.

Booking animal encounters for your first hour at the park means you’ll beat the midday heat and photograph marine life in better lighting conditions.

What to bring and leave behind

Pack sunscreen, refillable water bottles, and comfortable walking shoes for your Gulfarium visit. The park allows small coolers with snacks, though you’ll find a snack bar on-site serving basic meals. Leave large bags and backpacks at your hotel, as storage lockers cost extra and limited space makes carrying belongings inconvenient during shows.

FAQs for first-time visitors

First-time visitors to Gulfarium Marine Adventure Park Destin ask similar questions about planning their trip. You’ll find answers to the most common concerns below, covering everything from food policies to accessibility features. These details help you avoid surprises and make the most of your admission price.

Can you bring food and drinks?

You can bring small coolers with snacks and non-alcoholic beverages into the park without extra fees. The facility allows outside food in designated eating areas near the main aquarium building. Glass containers and alcoholic drinks remain prohibited under park safety rules. You’ll find a snack bar inside serving burgers, hot dogs, and cold drinks if you prefer buying meals on-site.

Do you need to book in advance?

General admission tickets work fine at the gate, though online purchases save you money and guarantee entry during crowded periods. You must book animal encounters at least 48 hours ahead through the park’s website, as these experiences sell out quickly during peak vacation weeks.

Booking online locks in lower ticket prices and lets you skip the ticket booth line completely.

Is the park wheelchair accessible?

All exhibits and show areas include wheelchair-accessible pathways with ramps connecting different levels. You can rent wheelchairs at the entrance for a small daily fee if needed.

gulfarium marine adventure park destin infographic

Final tips for a great day

Gulfarium Marine Adventure Park Destin rewards visitors who plan ahead and arrive early. You’ll enjoy shorter lines, cooler weather, and better animal interaction opportunities during morning hours. Wearing comfortable shoes matters more than you’d expect, since you’ll spend three to four hours walking between exhibits and standing during shows. Bringing your own snacks saves money and gives you more time exploring instead of waiting at the concession stand.

Combining your Gulfarium visit with other Destin experiences creates the perfect vacation day. Many families spend their morning at the marine park, then head out for afternoon water adventures. After watching dolphins perform in controlled environments, you might spot wild dolphins swimming around Crab Island during your pontoon rental. The contrast between educational exhibits and natural wildlife encounters gives you a complete picture of Gulf Coast marine life. You’ll leave with photos, memories, and a deeper appreciation for the creatures sharing these emerald waters.